

 Thanks: 0
 Likes: 0
 Needs Pictures: 0
 Picture(s) thanks: 0
Results 1 to 15 of 108
Thread: A ? about roof flashing
-
8th February 2007, 12:14 PM #1
 Novice


- Join Date
- Oct 2006
- Location
- Australia
- Posts
- 20
- Post Thanks / Like

 A ? about roof flashing
Hi,
I was wondering if you could tell me about the roof flashing. I have recently nearly completed a reno, it is joined on the back of my existing house, and it is 2 story. Where the existing house meets the reno brickwalls we have to use some kind of flashing to seal the join to prevent water getting in. I am of the understanding you cut a line in the brickwork paralel to the existing roof and put the flashing into that cut line and lay it onto the tiles? Does it just sit on the tiles? How far up the brickwork away from the existing roof should the flashing start? And how far across the tiles should the flashing lay to prevent water damage?
Thanks
-
8th February 2007, 01:48 PM #2
Dances with splinters
- Join Date
- Jul 2005
- Location
- Oberon, NSW
- Age
- 65
- Posts
- 0
- Post Thanks / Like
Personally, I believe the old lead flashing beats the new trend to colourbond stuff hands down, although it's both harder to come by and more expensive. IMHO it's worth it, though. Originally Posted by Mahaylea

I use an angle grinder to cut about an inch into the mortar bed at least one course of bricks higher than the roof line. With lead flashing, I fold back about 1/2" of the edge to be inserted, not all the way but enough so that it "wedges in" to the groove I've cut. A bead of silicone in the groove first helps.
Yes, flashing just sits on the tiles... lead flashing is moulded down to the tile surface with, preferably, a wooden tool (I use the end of a hammer handle to form a better seal. Silicone on top of the tile helps but isn't necessary. When joining lengths of flashing, use a torch to fuse the lead or a bead of silastic and rivets for colourbond. (Rivet over a gully in the tiles, not a peak!
  )
)
How much of the tile should it cover? This really depends on the fall of your roof... the flatter the fall, the further you need to cover. I'd say 6" average... check how far your tiles overlap each other, double that and that would be the absolute minimum for it to work. How far you'll actually cover depends on the width of your flashing and how far up the wall it runs... unless you've had some custom colourbond made up.
Really, it's probably better to get a licensed plumber to do this. If the plumber falls off the roof, breaks some tiles, you discover water damage from a botched job a few years down the line or, in a worst case scenario, all three it's his problem, not yours. Look at the cost as buying insurance.
I should, at this point, say I am not a plumber. I do not regularly flash rooves. I am not aware of current building regs on flashing. However, in my defense I'll say that I'm a JOAT who goes around fixing messes left by cowboys and AFAIK none of my customers have had to call out someone to fix my fixes. (Although I have had some ask for partial refunds. "I didn't know you'd do it so quickly."
 )
)
- Andy Mc
-
9th February 2007, 06:25 PM #3
 PLU.MBR.BL.DR.
- Join Date
- Jan 2007
- Location
- Adelaide - West
- Age
- 44
- Posts
- 311
- Post Thanks / Like
That up there is a pretty good way to do it, i think colourbond is harder because its not as soft. just follow the brick course.
I dont use silicone if i can avoid it can cause sweating mould and rust. If you do buy one with a neutral cure most other silicones are acidic and will take the protection from sheet roofs, dont know what they do to tiles.
Lead is easier if your a novice because there wont be any joins.( coulor bond is cut and shut, Lead isnt that much more expensive than colour bond, but it will cost you
I buy 300 wide rolls and dont trim them, just use the whole width,
when you put the folded end in the brick course, tap it in firm with a thin WIDE, blunt chisel like a brick bolster to get it in there good, make it hard to pull out. Start at the middle, work to each end.
I use a rubber mallet, gently.If you dont play it, it's not an instrument!
-
9th February 2007, 06:46 PM #4
SENIOR MEMBER
- Join Date
- Apr 2005
- Location
- Sydney
- Age
- 65
- Posts
- 882
- Post Thanks / Like
I think you’re supposed to lap join it every 1.5metres for expansion, and I reckon it would be a bit dearer than colour bond unless you used the cheap 15kg stuff that’s not rated for exposure. Originally Posted by bricks
I just make up lead wedges out of small rolled up strips of lead, beaten flat with a hammer, and punched into the gap above the flashing in the slot. It holds it in place whilst the silicone goes off, especially if you’re working on an angle flashing and you’re not stepping it with the brick courses.
-
9th February 2007, 08:03 PM #5
Dances with splinters
- Join Date
- Jul 2005
- Location
- Oberon, NSW
- Age
- 65
- Posts
- 0
- Post Thanks / Like
Agreed, that's a must. Even if it has no effect on tile glazing, it does affect the flashing over time. I should've mentioned it. Originally Posted by bricks

- Andy Mc
-
9th February 2007, 08:25 PM #6
Building Designer
- Join Date
- Sep 2004
- Location
- Strzelecki Ranges Victoria
- Posts
- 395
- Post Thanks / Like
I've got a dislike for stepped flashings [visually]
Whats the thoughts from you guys as to the pros & cons.Peter Clarkson
www.ausdesign.com.au
This information is intended to provide general information only.
It does not purport to be a comprehensive advice.
-
9th February 2007, 09:35 PM #7
SENIOR MEMBER
- Join Date
- Apr 2005
- Location
- Sydney
- Age
- 65
- Posts
- 882
- Post Thanks / Like
Well it's the only way to do it if you really want the job done properly. Remove the bricks in two brick sections. Install a trayed over-flashing that spills into the next lower one behind the wall. Replace the bricks, wait for a week for the mortar to set, then remove the ones you haven't yet done to finish the job with a weephole at the bottom in the returning wall. Originally Posted by ausdesign
Aesthetically I like the look of a stepped flashing so long as they've taken the time to get all the steps even and parallel to the pitch, and they've tapered the bottom in a straight line at the finished roof level, with the under-flashing emerging across the tiles. When I see it it tells me that they may not have cut any corners by just cutting a slot with a grinder, and if they've done it properly then no water will travel down the wall underneath, unlike just doing a grinder cut slot.
I also prefer the look as well though.
It's the way it was done in the past, and it's the way it's supposed to be done for mine.
Would you cover up a perfectly executed japanese dovetail joint with a piece of veneer to make the piece look sleeker, and more [visually] appealing?
I wouldn't.
-
10th February 2007, 12:27 AM #8
GOLD MEMBER
- Join Date
- May 2003
- Location
- Kuranda, paradise, North Qld
- Age
- 63
- Posts
- 2,026
- Post Thanks / Like
It's not often that I would agree with a post pretty much word for word, but what John's said it.

Mick"If you need a machine today and don't buy it,
tomorrow you will have paid for it and not have it."
- Henry Ford 1938
-
10th February 2007, 11:36 AM #9
PLU.MBR.BL.DR.
- Join Date
- Jan 2007
- Location
- Adelaide - West
- Age
- 44
- Posts
- 311
- Post Thanks / Like
Personally i wouldnt feel comfortable taking bricks out of a perfectly good wall, lead will fill the gap nicely if doubled or tripled over and "knocked in"
With lead flashing, it streaches, moulds and shapes to whatever you hammer it into, as for expansion i dont think it actually expands that much lengthways, ususlly the ridgid metals expand and the softer ones dont,
Id try to avoid a join in anything where possible, your only introducing another weak point or possible leak IMO.
With anything Im not an expert at I take my time and dont rush it, Usually repairs = longer time than to install properly once.If you dont play it, it's not an instrument!
-
10th February 2007, 11:49 AM #10
SENIOR MEMBER
- Join Date
- Apr 2005
- Location
- Sydney
- Age
- 65
- Posts
- 882
- Post Thanks / Like
You might also feel comfortable with water soaking in and traveling down through the wall to your new extension below, peeling the paintwork and growing mould on the wall. Or you could just silicone the whole wall above, or clad it with something to stop it getting wet. Originally Posted by bricks
Of course chopping the bricks out is a pain in the @rse, but it is the proper way to do it.
I'm just going by the instructions that are written on the label when you buy a roll of lead. I'm pretty sure that it says '1.5 metre maximum length'. I'm almost certain that it's not more than 2 metres, but of course you could ignore the instructions and roll it out as long as you want and see what happens. Originally Posted by bricks
Of course if you want to do a cowboy job and just butt the joints with silicone instead of overlapping them and sealing it up, then yes, I'd certainly recommend not cutting it into 1.5 metre strips.
None of my flashings leak and they're done as per manufacturers specifications (usually )
-
10th February 2007, 04:20 PM #11
SENIOR MEMBER
- Join Date
- Aug 2005
- Location
- Victoria
- Posts
- 412
- Post Thanks / Like
I have never seen it done this way. Originally Posted by pawnhead
Tools
-
10th February 2007, 04:48 PM #12
SENIOR MEMBER
- Join Date
- Apr 2005
- Location
- Sydney
- Age
- 65
- Posts
- 882
- Post Thanks / Like
You've obviously never inspected a semi detached house with a parapet wall, or installed a raked flashing properly then. How would you install a raked flashing on a parapet wall that was built with dry pressed clay bricks? Originally Posted by Tools
Clay bricks are quite porous, and so is the mud that's used between any bricks, so how are you going to stop water soaking into the wall and traveling down through the brickwork to the internal wall below?
If bricks were waterproof then there'd be no need for cavities and we could all save a lot of money.
Ask Al. He's a brickie and I'm sure that he's installed lots of flashings in his life.
-
10th February 2007, 05:43 PM #13
SENIOR MEMBER
- Join Date
- Apr 2005
- Location
- Sydney
- Age
- 65
- Posts
- 882
- Post Thanks / Like
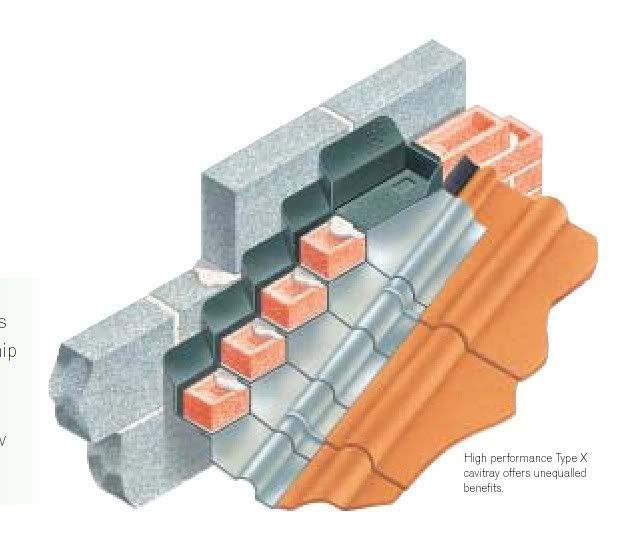
Google turned this up: -

That's a preformed flashing tray, but they are generally formed on site out of lead.Introduction: Every stepped and every staggered gable abutment must be so constructed to prevent rainwater and dampness from penetrating below the abutting roof line. This is because the external skin changes status below the roof line and becomes an internal skin. Accordingly, any preformed system must meet three basic requirements:
1 It must prevent dampness from penetrating below the critical stepped roof line.
2 It must externally weatherproofs and flash the physical roof/masonry intersection.
3 The arrangement must always protect the inside skin also from becoming damp.
http://www.cavitytrays.co.uk/damp_products.php?id=typex
-
10th February 2007, 07:01 PM #14
PLU.MBR.BL.DR.
- Join Date
- Jan 2007
- Location
- Adelaide - West
- Age
- 44
- Posts
- 311
- Post Thanks / Like
Not trying to start an argument here pawny but how do you take out every brick along a wall line and not have it fall over, you would never get the same strength back into the wall pushing the bricks back into their slots. and youd have to wait for each section to dry before starting the next. really mate im not trying to argue but i cant see how youd do it.
mate if you have your flashing extending up the wall at least to the first course, water wont get to the bricks, thats part of why flashing is there.
not trying to argue.If you dont play it, it's not an instrument!
-
10th February 2007, 07:58 PM #15
SENIOR MEMBER
- Join Date
- Apr 2005
- Location
- Sydney
- Age
- 65
- Posts
- 882
- Post Thanks / Like
As I've said, You take two out and leave two, then take another two out and leave two. You grout them in by pushing the grout in with a plugging chisel or the like, then you wait a week untill you do the rest. It's actually better to take two out and leave the next four, and do the job in three stages: - Originally Posted by bricks
Originally Posted by pawnhead
Well you can do your jobs as dodgy as you want, and cut as many corners as you want. It doesn't worry me at all. I'm just trying to tell you how it should be done if you want it done properly. Originally Posted by bricks
You can't guarantee that you'll fulfill those requirements with a grinder cut slot.Introduction: Every stepped and every staggered gable abutment must be so constructed to prevent rainwater and dampness from penetrating below the abutting roof line. This is because the external skin changes status below the roof line and becomes an internal skin. Accordingly, any preformed system must meet three basic requirements:
1 It must prevent dampness from penetrating below the critical stepped roof line.
2 It must externally weatherproofs and flash the physical roof/masonry intersection.
3 The arrangement must always protect the inside skin also from becoming damp.
http://www.cavitytrays.co.uk/damp_products.php?id=typex
edit: - I worked on a job in South Sydney where I had to do exactly that. Cut out the bricks in stages because the builder installed a saw cut flashing and the internal wall below was damp. The owner wouldn't accept the builder treating the outside wall with a silicone waterproofing.
He insisted that it be done properly so that any water striking the wall above the flashing, wouldn't soak into the bricks and mortar, and travel down the wall, around the saw cut (which does not penetrate the wall), and end up dripping in his power point where his plasma TV is plugged in downstairs.

 Reply With Quote


Similar Threads
-
pergola roof over tile house roof
By Lbudgie in forum PERGOAS, GAZEBOS, STROMBELLAS & ROTUNDASReplies: 3Last Post: 24th March 2006, 05:58 PM -
Long span garage roof deck, more thoughts
By Wildman in forum DECKINGReplies: 4Last Post: 29th September 2004, 08:00 PM
Bookmarks