

 Thanks: 0
 Likes: 0
 Needs Pictures: 0
 Picture(s) thanks: 0
Results 1 to 10 of 10
Thread: Restoring an old Pedestal Desk
-
17th August 2007, 04:22 AM #1
 Apprentice and Hobbyist.


- Join Date
- Aug 2007
- Location
- Manchester England
- Posts
- 9
 Restoring an old Pedestal Desk
Hi all,
I have always been very interested in restoring and reviving old furniture to something great again.
I bought a load of books and have read a lot about it, however there are some things that I am struggling with...
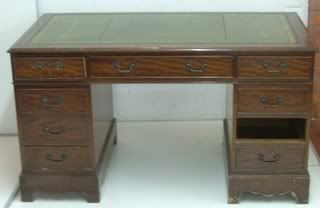
I bought this the other day, for less than £30!!! A couple of pics:
<o>I intend to document, photograph and display this from start to finish, on these forums, and get advice along the way from all you knowledgeable folk!<!--[if gte vml 1]><v:shape id="_x0000_i1026" type="#_x0000_t75" alt="" style='26.25pt;13.5pt'> <v:imagedata src="file:///C:\DOCUME~1\LUKEPA~1\LOCALS~1\Temp\msohtml1\01\clip_image003.gif" o:href="https://www.woodworkforums.com/images/smilies/actions/2thumbsup.gif"/> </v:shape><![endif]--><!--[if !vml]--><!--[endif]-->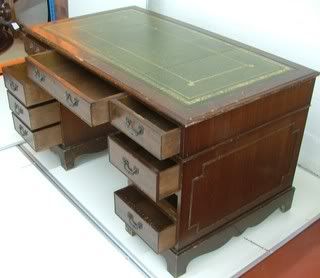

</o>
I can see a couple of things with the unit:
1) Scratched finish coating in general
2) Missing Handle
3) Scratched finishing coat on leather inlay
4) Warped drawer (hence its lack of prescence in the picture
I intend to do it in the following order:
1) Remove top, strip, recoat.
2) Rejuvinate and recoat the leather inlay.
4) Fix warpage on the drawer
3) Remove the top coat on each pedestal and drawer front, recoat.
4) Replace handle (or replace all handles?)
So, on to stage 1)
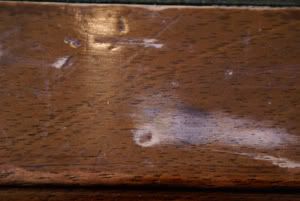
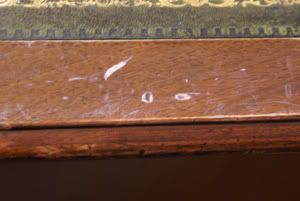
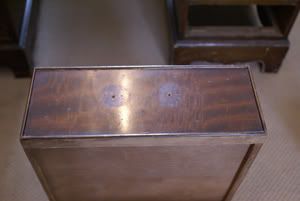
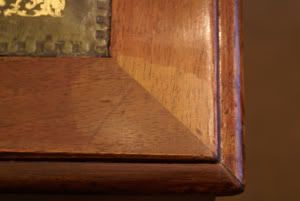
As you may be able to see, it has lots of scratches to the top surfaces of the varnish/shellac finish.
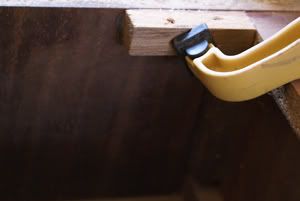
I removed the top from the upper carcass, it was held on with a few screws, so I could work on it properly.
I got some fine wire wool and meths on the wooden surface of the top, here is my first problems:
The meths and wool have removed the top layer, and some of the lower layers in places to bare wood. Will I be able to just coat these, or will I need to stain the bare wood to match the wood that has a couple of layers remaining before finish coating them?
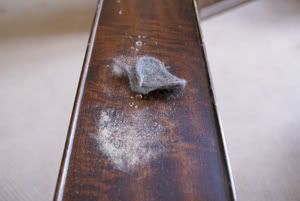
<!--[if gte vml 1]><v:shape id="_x0000_i1027" type="#_x0000_t75" alt="" style='13.5pt;14.25pt'> <v:imagedata src="file:///C:\DOCUME~1\LUKEPA~1\LOCALS~1\Temp\msohtml1\01\clip_image004.gif" o:href="https://www.woodworkforums.com/images/smilies/sad/shock.gif"/> </v:shape><![endif]--><!--[if !vml]--><!--[endif]--> Second problem is the removal has left deposits of the shellac in all the intricate grooves at the edges of the top. The deposits are now white and I don't know how to remove them.
Is the answer just to wipe ane wipe and wipe with clean cloths and meths until it all redissolves and comes off?
-
17th August 2007, 09:39 AM #2
Head Moderator
Sister of the DarkSide
- Join Date
- Dec 2004
- Location
- Toowoomba Q 4350
- Posts
- 3,491
Hi Luke
Very nice desk. A good project to learn with.
However, a few questions first to help point you in the right direction.
1. How old is the desk? Is it a genuine antique? Do you know who made it?
If it is a genuine antique, it will be valuable just as is. If you do too much restoration to it, it will lose it's antique value and just be a refurbished desk.
2. what end result are you looking for? a piece brought back to complete usability, a piece that keeps it's aged character and patina (where possible). I suppose what I'm trying to say here, is the end result you want, will very clearly point what sort of restoration/refinishing work is done to it.
3. Is it made from solid timber or veneered timber? If solid, then sanding away won't be too bad. If veneered, be careful you don't sand through the veneer ruining it. Be prepared to repair or replace the veneer where needed.
4.Warped Drawer - either work with the old drawer to staighten it, or replace the backend and keep the front. If replacing, make it exactly the same the other was made.
5. Handles - I would suggest trying to find another handle to match. Keeping the original handles keeps the authenticity of the piece.
6. The leather insert. Glad to hear you would prefer to keep the leather than replace it. Talk to a saddlery place in your area for ideas on working with the leather.
7. Steel wool - do not use steel or wire wooll on bare timber. bits of the wire end up remaining in the timber and they will rust, ruining the finish.
8. Be careful with the sanding. I'd suggest you only lightly sand back to reduce (not totally remove) the scratches as some may be very deep and you'd end up with thin spots or hollows in the piece.
9. try to find out what finish was used on it. the age of the piece will be a good guide here. Most likely it was shellac and if so, lightly sanding back the surface and recoating with shellac is ok.
My suggestions - hope they help - it's a nice desk.
cheers
Wendy Box Challenge 2011 - Check out the amazing Boxes!
Twist One - Wooden Hinge/Latch/Catch/Handle
Twist Two - Found Object
Twist Three - Anything Goes
-
17th August 2007, 12:54 PM #3
GOLD MEMBER
- Join Date
- Mar 2007
- Location
- Munruben, Qld
- Age
- 83
- Posts
- 0
Nice desk Lukey, I would agree with Wendy on this one, keep the desk authentic as possible if it is really old. Retain as much character as possible too and don't worry too much about completely removing the scratches. As Wendy said, it is so easy to devalue an antique by restoration if it is not done properly. Some old pieces are more valuable if you do nothing to them. However, I am sure you have taken all this into consideration when starting out on this project. It is going to be very interesting to watch your progress with the desk and I look forward to seeing your progress pics. Good luck, it looks very challenging.
Reality is no background music.
Cheers John
-
17th August 2007, 06:31 PM #4
Apprentice and Hobbyist.
- Join Date
- Aug 2007
- Location
- Manchester England
- Posts
- 9
Hi, thanks for the replies so far.
Wendy, in reply to your questions:
1) AGE - The desk is half solid, and half veneered chipboard...the veneer on this is about 3-5mm thick in places, so I believe that it dates from before 1950?
That date also tallies in with what I was told when I purchased it.
2) INTENTIONS - I am not looking for mirror finish or anything like that. I want to retain its current patination, and touch up/refinish all the scratches, hopefully retaining its character.
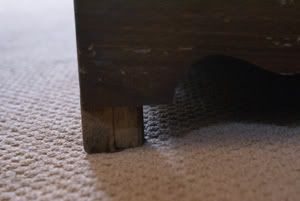
3) SOLID OR VENEER - As 1. There is a piece of the bracket feet missing which I am going tro have to completely replace...I am hoping that a piece of wood I have sourced from a broken beyond repair vicorian cabinet will suffice for this.
4) WARPED DRAWER - I have already solved the problem with the warped drawer, a quick shuffle about of the drawers and it looks like it was just in the worng hole They all fitr perfectly now, and are extremely snug.
5) MISSING HANDLE - I want to find handles to match, but I haven't a clue where to start looking. I have looked on ebay with no results...is there anywhere you guys/gals can point me to without having to cast a new one myself? This looks like a tricky process!
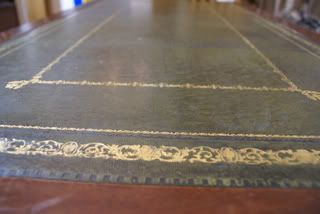
6) LEATHER - After giving the leather a really good clean with meths to take the top layer oflaquer off, it actually looks fantastic. There are a couple of nicks in the leather but I can live with that. You can't see them without really looking now. I am also happy that all the gilding has stayed perfectly in place, I was gentle around these areas. Hopefully a new covering of laquer will cover most of the small, tiny scratches in the surface. Would it be beneficial to 'feed' the leather with something before I recoat with laquer?
7) STEEL WOOL - Too late, I have already used it TBH it has given me a good result. I am trying not to take it back to bare wood, only remove the top layers, so hopefully it wont be too bad. What else would be preferable instead of steel wool? I don't like sanding as in my opinion it takes away too much of the marks that have built up over time. I would prefer to remove the top layer of polishes/dirt/grime and keep the patina underneath.
8) SANDING - There are a couple of very deep scratches to the top, instead of getting them perfectly smoothed I am just going to stain them and retain for character. To be honest, they are more pressure marks where its been knocked instead of scratches.
9) EXISTING FINISH - Dissolves easily with the meths, and resets quickly - I THINK it is shellac. The actual carcasses of the pedestals are OK as they are, so I will lgive them a good polish and that shuld suffice.
The drawer fronts and table top however does have scratches to the surfacework. This, I feel, I have no option but to rub back and recover with shellac.
Munruben -
Hopefully I will be able to retain its marks of age. I am struggling with a decision on one thing though - the front of the table top has worn to the edge because of its use over time. Now that I have the table top off, i am wondering wether to spin it around and refix it the other way round on the carcass so that the front edge is a good one.
My camera has decided to bust on me So I will have to borrow my sisters to get some progress pics...I am working pretty fast on it at the moment, most of the prep work on the carcasses and the table top is done.
Anyone have any thoughts on wetherI need to stain the bare sections of wood, or would a coat of shellac cover these missing sections up?...any tips on how to go about it to get a perfect colour match?
I think that I will need to get a fine brush and stain to match, then shellac/laquer over the top. Am I right?
Luke
-
18th August 2007, 02:09 AM #5
Apprentice and Hobbyist.
- Join Date
- Aug 2007
- Location
- Manchester England
- Posts
- 9
I have done quite a lot today indeed!
First, finished stripping off the top, and cleaning the leather.
Then I went on to begin staining the top so that it almost colourmatched.
Before and after pics

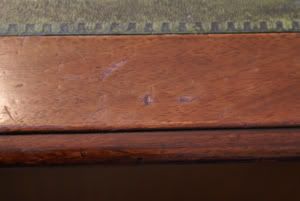
There was also a piece of moulding that was missing on the upper carcass, I have fashined and replaced this with a completely new piece of wood, sanded it down and stained it to match as much as I can.
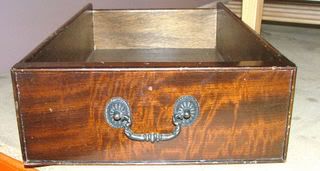
So, after doing this, I still had a load of spare time. I set about starting the drawers, as you can see there is a lot of discolouration to the wax, there is lots of grease and grime built up, and loads of little scratches that can't be made out in this picrure...
First I gave the fronts a good going over with wire wool:
Then stained all the moulding and nicks in the surface that needed it. The intention was never to perfectly match the colour, so it still looked worn.
...
-
18th August 2007, 02:10 AM #6
Apprentice and Hobbyist.
- Join Date
- Aug 2007
- Location
- Manchester England
- Posts
- 9
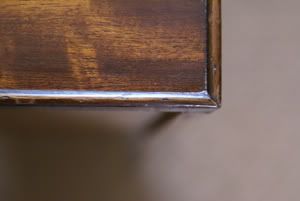
A bit of finishing wax and a good buff later, the result of the drawers after 3-4 layers of wax and polish:
This seems to be the finish I am looking for, as I said ealier I don't want it mirror finish at all. The nicks that you can see near to the handle holes are where the backplates have spikes that sit in the wood, this ill all be hidden when it is completely put back together.
Now that the stain has dried on the top, I have given it a once over of varnish with a thin coat. I am going to brush this down with the fine grade steel wool, and give 4 or so coats to it. Then get some pics!
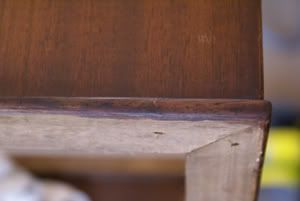
I have also repaired some of the carcasses - the top was missing a support, I have made a new one and glued it in place..with pre drilled holes for fixing to the worktop..I was wondering wether to also screw it in, but the existing ones are only glued?
5 slamplates were missing from behind the drawers. I figured that the reason they have broken is probably due to continued closing of the drawer fronts onto them. I measured and cut replacements from old thin plywod (matching) and decided to glue and nail using blunted tack pins to prevent them breaking off in the future.
Old oneI am still undecided and uneducated on which type of sealant/ laquer to use on the leather surface, if anyone has any advice. And still looking for those handles.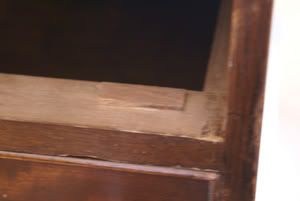
New one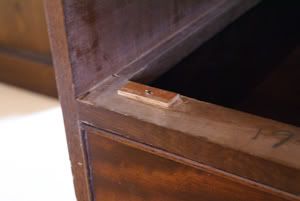
I have to fashion a new part of thebracketfoot, if anyone has any advice on the best way to do this?
All in all, I think its looking pretty good and I am (so far!) happy with the result.
Comments from anyone as to progress - good or bad? Any thing I could have done better? All tips welcome as I have just bought another one to do

-
18th August 2007, 10:38 AM #7
GOLD MEMBER
- Join Date
- Mar 2007
- Location
- Munruben, Qld
- Age
- 83
- Posts
- 0
Wow, you are just flying along and all looks good. The colouring is great match and pleased to see you have retained the character in the timber.
Regarding the handles, maybe you will find what you need at one of the antique fairs or even a junk shop, you may find something similar but you may have to replace all the handles if you cant find the exact one.
The drawers look just fine. Did you shellac them before you waxed and polished them. you only mentioned staining. I think the original finish may have been french polish, which was very popular in the 50s.
Sorry can't help you with the leather work but I am sure someone in here will be able to.
Keep up the good work and keep us posted on your progress. Very interesting project.
Reality is no background music.
Cheers John
-
18th August 2007, 06:52 PM #8
Apprentice and Hobbyist.
- Join Date
- Aug 2007
- Location
- Manchester England
- Posts
- 9
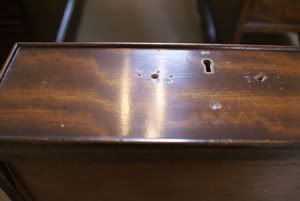
It was going too well...first problem.
I gave the worktop 3-4 brushed coats of quick drying varnish, smoothed between each layer. This morning I went to start polishing it a bit with wax...ended up with this mess:
I think I know the reasons, and its stupidly "school boy error" ! If you look back to where I stripped the top back, one layer of the old laquer was left on. I ran stain over the entire thing, instead of using a coloured varnish. I think this has led to the stain not penetrating and just sitting on top of the old finish, which is obviously not what it is designed for.
Also, the stain is spirit based and the varnish is water based , resulting in a difficulty in covering the freshly stained bare wood parts...
So, wasted a lot of time with that stupid error or judgement, but hey, we live and learn. Its the only way we can improve. So, lets look onwards.
What will be the best thing now?
I am thinking at the moment - Strip the water based varnish off, strip the stain overlay off, then find an oil based coloured varnish and build up layers until the colour is correct, then clearcoat with oil based?
I don't want to rub the original finish off completely unless I have to as it does have good patination in places.
Am off to bed now, worked nights last night until 7am, and at the time of posting this its 9am in England. Hopefully someone will come up with some good suggestions for me to crack on with when I wake..or tomorrow.
Thanks folks
-
20th August 2007, 03:00 AM #9
Apprentice and Hobbyist.
- Join Date
- Aug 2007
- Location
- Manchester England
- Posts
- 9
Anyone?
Should this be moved to the work in progress section or should I leave it here?
-
20th August 2007, 09:59 AM #10
Head Moderator
Sister of the DarkSide
- Join Date
- Dec 2004
- Location
- Toowoomba Q 4350
- Posts
- 3,491
Hi Lukey
No, leave your posting here. It's a great WIP on finishing/restoring and so is in the perfect spot.
I'm impressed with your work to date on the desk, especially the leather top. I would suggest you talk to a leather shop or saddlery shop to see whether they have a sealer that you could use after feeding the leather. Otherwise, just use the sealer as the two may not work together at all.
cheers
Wendy Box Challenge 2011 - Check out the amazing Boxes!
Twist One - Wooden Hinge/Latch/Catch/Handle
Twist Two - Found Object
Twist Three - Anything Goes

 Reply With Quote

Similar Threads
-
The help desk -- how may I help you?
By Bob Willson in forum JOKESReplies: 5Last Post: 17th November 2004, 04:45 AM -
Restoring a Desk
By Shane Watson in forum FINISHINGReplies: 4Last Post: 26th February 2002, 04:25 PM
