Results 1 to 9 of 9
Thread: Chess board finishing problem.
-
22nd January 2013, 05:16 PM #1
 Novice


- Join Date
- Feb 2011
- Location
- Munruben
- Posts
- 2
 Chess board finishing problem.
Hello Gurus. Just wondering if I can pick someone's brains on a project I have completed. (Apologies if this sort of thing has been answered elsewhere as I'm a bit of a rank amateur at this timber caper.)
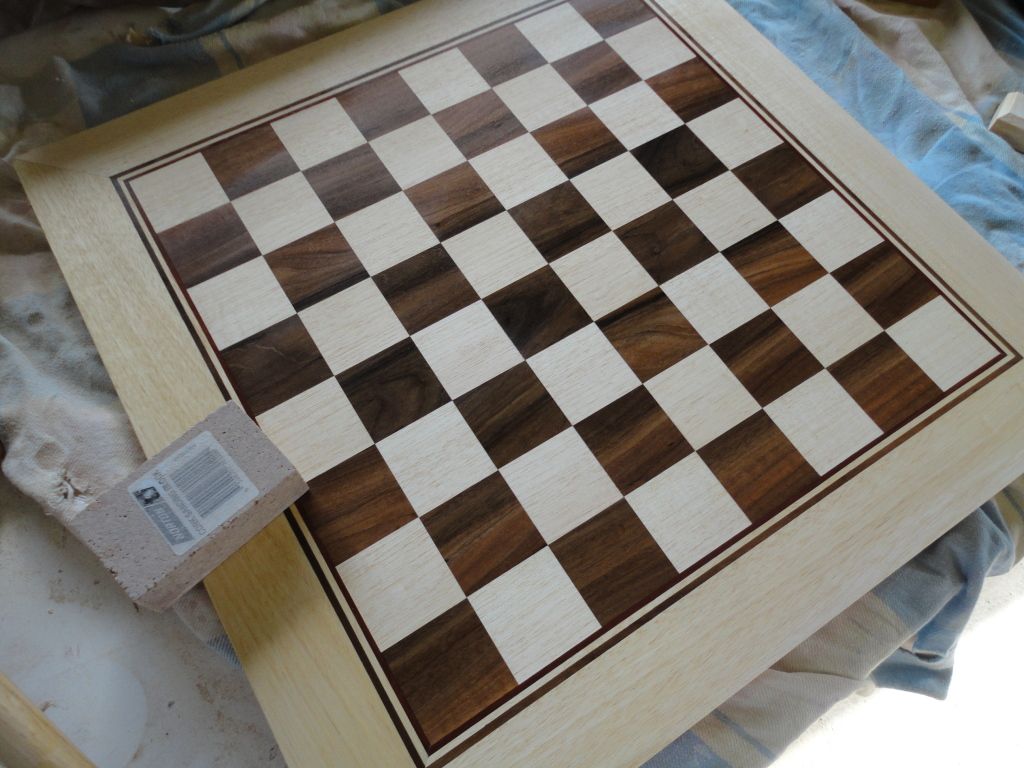
Here's some happy snaps just prior to oiling.


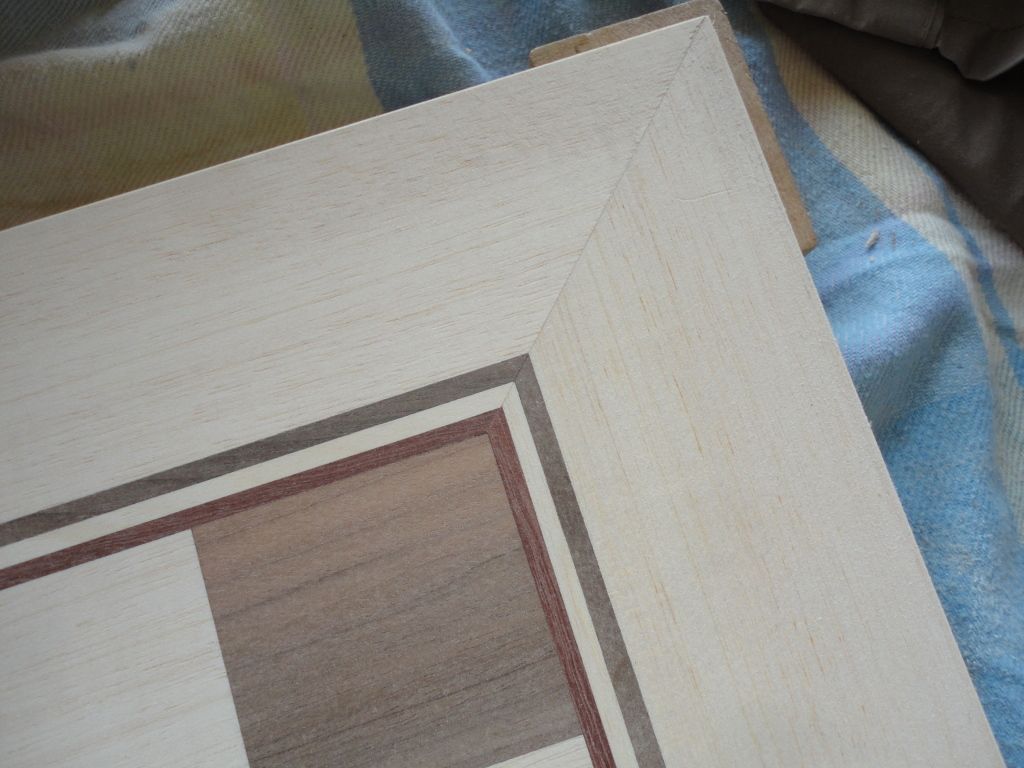
Just a bit of background information first though. The board is constructed from 3 different timbers. The white squares and outside frame is Victorian Ash, the black squares are Qld walnut and the timber closet to the squares about 3mm wide is jarrah then 3mm of ash and then 3mm of walnut. The timber is solid all the way through (upside down it looks the same) and it's about 22mm thick. Overall it's roughly 450 x 450mm.
I've finished it with 600, 900, 1200, 1500 and 2000 grit(?) paper and then applied 3 or 4 coats of Organoil Woodsheen Rejuvenating Buffing Oil per the instructions on the back for new timber.
When it was done I gave it a you beaut buff with a cloth and it was pretty as a picture and as smooth as glass.
Disappointingly about a week later as I lovingly caressed the surface of the board for the millionth time my fingers picked up the edge between the different timbers. I'm putting that down to different rates of contraction and expansion I suppose.
My question is can something be done to stop that edge from appearing such as sealing the timber with something like mini-wax wipe-on poly or am I just chasing my tail and will have to live with it.
Many thanks in advance for any replies.
PS The white squares have gone a little yellow which is a bit of a bummer. Can anything be done about that? I stayed away from varnish because I heard that yellows the timber up but now I have the same problem.
-
22nd January 2013, 07:56 PM #2

Hi Muz
Firstly let me say you have done a truly beautiful job there! Very very impressive (especially if the other three mitres are nearly as good as the one in the picture)!
If it is due to contraction from timber-seasoning I would suggest it may be worthwhile to allow it to continue to season for maybe 6 months with an occasional oiling monthly or so. At the end of that time, I'd consider resanding (starting at the finest grit that will remove the edges between the different timbers, then progressing back up to 2000 grit or so. I know this will mean refinishing it, but it is so beautiful I'm certain it will be well worth the effort.
Cheers
Phil"Come sit down beside me" I said to myself, and although it didn't make sense,
I held my own hand as a small sign of trust, and together I sat on the fence.
-
23rd January 2013, 06:36 AM #3

Muz
You say it's 22mm thick and solid board. So yes the problem is the different movement of the timbers. However your fingers are extremely sensitive and although you can feel the movement I very much doubt you could see it.
Having oiled it you won't get a WoP to adhere to the surface now. So I'd definitely go with Antiphile's suggestion but make sure you balance the oiling on both sides equally, to ensure the equilibrium of moisture absorption/loss as the humidity changes.Dragonfly
No-one suspects the dragonfly!
-
23rd January 2013, 10:01 AM #4
 Novice


- Join Date
- Feb 2011
- Location
- Munruben
- Posts
- 2

Many thanks for your reply and kind words antiphile. (The other 3 corners are the same. Took me hours to get that bit right.)
You are right dr4g0nfly in that you can barely see it. The difference is extremely minor. I'll just keep oiling it for a few months and see how she goes.
I appreciate your advice.
Muz
-
23rd January 2013, 07:58 PM #5
 GOLD MEMBER


- Join Date
- May 2003
- Location
- Central Coast, NSW
- Posts
- 614

That looks very nice, with no gaps anywhere, but how have you accounted for expansion/contraction across the board, as it seems to be enclosed within a mitered frame of fixed size?
Cheers
ArronApologies for unnoticed autocomplete errors.
-
23rd January 2013, 08:57 PM #6

Hi Muz,
Just a suggestion. Antiphile is right about treating both sides of the board the same way and you probably should refinish it.
It's possible that the oil has not sunk into the timber as well as it should have, probably could have used some wet sanding at 2000g and possibly 4000. (Heat sealing can help polymerise the oil in the timber.)
Anyhoo, the bottom line is that the raised edges may be occurring as the oil dries and also sinks into the timber, I would expect that the squares are rougher in general, compared to the newly finished product.
If this is the case, you can refinish using only the 1000 and 2000 pads dry and this may help or even fix the problem.
As far as keeping the squares white, I think you would be best to strip the board and refinish using White Shellac.
Regards,
Rob
-
23rd January 2013, 09:38 PM #7
 Novice


- Join Date
- Feb 2011
- Location
- Munruben
- Posts
- 2

There's no expansion joints as such but there's about a thousand biscuits joining the whole thing together including the mitred corners so I'm hoping that'll hold it steady.
As an amateur I din't really consider that part of the job. (You don't know what you don't know as they say.)
-
23rd January 2013, 09:45 PM #8
 Novice


- Join Date
- Feb 2011
- Location
- Munruben
- Posts
- 2

Ok thanks heaps for that. I thought about wetsanding it but I discounted it on account that I thought I may bleed the darker square's slurry into the lighter squares. At least that's what I thought would happen.
I will keep adding oil though at monthly intervals for the next few months and see what happens. Then I'll resand it.
White shellac eh? I'll have to google that. If I want to give that a crack how much do you think I'd have to sand off to get rid of the oil finish before heading down the shellac route? (Bit of a 'how long's a piece of string' question I guess.)
Actually I have a koto / black bean one in progress at the moment with an intended black bean frame so maybe I can give that one the white shellac treatment.
-
26th January 2013, 11:19 PM #9
 Intermediate Member


- Join Date
- Dec 2011
- Location
- Central Queensland
- Posts
- 0
 Glue creep the culprit?
That's a lovely piece of work.
I don't know much but I have had this tiny little ridge turn up before, in my case the two pieces were the same species - cut from the same board and even had the grain in the same orientation, so it shouldn't have been differential expansion. If the timber was well seasoned to start with wouldn’t it stand to reason that those ridges would disappear when the weather changed and the timber shrank back to normal?
In my case the ridges came up about a week or two after painting (nitro) and have stayed the same for the last three years. I asked a bloke who does restorations for a living and he blamed glue creep. Apparently the two bits of wood can still be level but the pva type glue I used can absorb and swell a little making a ridge on the glue line. So with a different choice of glue I may have missed out on this "learning experience" (read - stuff up).
Does this sound like a possible scenario in your case or am I barking up the wrong tree?
Tom
ps final thought then I'll leave you to the better brains to sort this out - does the same ridge appear on all the glue lines? eg black squares to white and in the mitre joints white to white?Last edited by tom42cook; 27th January 2013 at 11:37 AM. Reason: make corrections - still learning how to spel


 Reply With Quote


Bookmarks