

 Thanks: 36
 Likes: 75
 Needs Pictures: 0
 Picture(s) thanks: 0
Results 1 to 15 of 85
-
14th July 2014, 06:51 PM #1
 Life's Good, Enjoy each new day & try to encourage


- Join Date
- Dec 2009
- Location
- Faulconbridge, Lower Blue Mountains
- Age
- 68
- Posts
- 9,060
 Prime-mover Truck from Construction Series - Wood Magazine + Peterbilt modifications!
Prime-mover Truck from Construction Series - Wood Magazine + Peterbilt modifications!
Well it's time to start another wooden toy project so as to keep busy in the shed,
though I will have to stop for a while as I make a Ball/Pipe Maze for Tracey for Kindygym next week....
Brett from Katoomba gave me a heap of pretty Black Sassafras offcuts and it got me thinking; if I laminate [glue] them together I could use them as part of a truck build. Must also say THANK YOU to Brett for the Group Buys as the Colt Brad Point Drills are magic.
As most are becoming aware I'm a fan of the Peterbilt Truck and a good friend sent me a few photos of a beautiful black 1988 Peterbilt 379 with a big sleeper which frequencies his work.
And so the journey has begun, using the Wood Magazine Tractor & Trailer plan as a base, I found some photos & drawings of the Peterbilt prime-movers with the large sleeper and scaled them against the Wood plan.
The whole truck 16" long plus the front & rear bumper bars while the original plans are only 13" overall.
Last week I asked a few of the forum toymakers and model makers, by email, about specific timber selection, receiving a good array of responses; thank you gents.
I've spent this past week measuring and cutting making up parts, plus I made a sled for my small bench saw to keep the fingers safe.
I'll start be adding the block photos from the iPhone, the 'pdf' of the Aussie Peterbilt for inspiration and the first mockup of the truck.
Handy has of course been helping, he was the one who suggested that I make the sled; very safety conscious little bloke.
Timbers I've used thus far are.....
Black Sassafras [Sleeper & Fifth Wheel], Merbau [Cabin & Radiator], Huon Pine [Engine], American Walnut [Front Mudguards], Rosewood [Exhaust Stacks & Bumper bar], Telegraph Pole Gum Tree [Chassis], Tassie Oak [Side Steps, Sleeper Raiser & Bumper Supports] , American Oak [Exhaust Pipes & Air Cleaner]]...
The wheels, the axle pegs, the air cleaner hood, fuel tanks [doubled up] plus the golf tees are all shop bought...
I've invested some 15+ hours into the project thus far and am extremely pleased with the progress and project build...it will evolve more as the truck takes shape with more extras......
The grandsons will be very happy to see another truck to play with in a month or so....with a drop deck or lowboy trailer to follow....
Cheers, crowie
-
14th July 2014, 07:13 PM #2
On a journey
- Join Date
- Oct 2008
- Location
- Leopold, Victoria
- Age
- 65
- Posts
- 2,964
Gee you're flying on this one Peter. It's nearly finished before you have started. I will be watching to see how another of these construction series comes up (plus your mods).
Dallas
-
14th July 2014, 07:39 PM #3
Life's Good, Enjoy each new day & try to encourage
- Join Date
- Dec 2009
- Location
- Faulconbridge, Lower Blue Mountains
- Age
- 68
- Posts
- 9,060
Yes Dallas, crow's are pretty quick to the wing....
 ....except were road trains & road kill are concerned....
 ....the mods & personal touches make it fun.
-
14th July 2014, 11:17 PM #4
Deceased
- Join Date
- Mar 2013
- Location
- St. Helens Tasmania
- Posts
- 2,222
This is going to be so Kool!!!!

-
14th July 2014, 11:30 PM #5
Senior Member
- Join Date
- Jan 2014
- Location
- Washington State, USA
- Posts
- 329
Yahooo!
Another build to watch!!! This is going to be good.
Thanks for bringing it too us.
-
14th July 2014, 11:43 PM #6
GOLD MEMBER
- Join Date
- Nov 2008
- Location
- Canterbury UK
- Age
- 67
- Posts
- 2,617
-
15th July 2014, 02:05 PM #7
SENIOR MEMBER
- Join Date
- Feb 2012
- Location
- Nowra, NSW, Australia
- Age
- 66
- Posts
- 950
You're off to a great start, Pete. Looking good.
And you're getting too fast - you need to try your hand at a nice, complex scale model. (Pretty close already, I reckon.)... Steve
-- Monkey see, monkey do --
-
19th July 2014, 09:42 PM #8
Life's Good, Enjoy each new day & try to encourage
- Join Date
- Dec 2009
- Location
- Faulconbridge, Lower Blue Mountains
- Age
- 68
- Posts
- 9,060
Thank you Trev, Paul, Derek & Steve.... I've made a little progress as the photos show, but still a long way to go....
The sanding has dried out my skin and I have a number of winter cracks in my fingers, and they hurt.
The grill has been glued to the engine.
The headlights have a peg for securing to the engine [I had to make a jig to allow me to drill a nice neat hole in the side of the 3/4" show bought headlights], they are just sitting in place on the engine for the photo.
The exhaust pipe is glued to the stacks.
The front mudguards have been cut out and shaped.
The sunvisor has been glued in place.
The holes for the axle pegs have been drilled in the chassis and the front wheel space glued in place.
The front bumper supports/mudguard supports are glued in place.
It's been quite cold here over the past couple of days so shed time hasn't been as pleasant, but still good fun and hopefully more tomorrow.
Cheers, crowie
-
19th July 2014, 09:52 PM #9
Hotrod
- Join Date
- Jun 2010
- Location
- Leander, TX Central Texas Area
- Age
- 45
- Posts
- 496
Wow Peter you are moving right along. I love how you mix the timbers and break up the different body parts. The Cab visor looks great love all the details you add to the original model. Look forward to the next installment. I have been working out in the woodshop for the past week but no toy making. I am making a bunch of cabinets for "The Hanger" as you have dubbed it.
Bret
P.S. I send you some pics on email.
-
19th July 2014, 09:59 PM #10
Life's Good, Enjoy each new day & try to encourage
- Join Date
- Dec 2009
- Location
- Faulconbridge, Lower Blue Mountains
- Age
- 68
- Posts
- 9,060
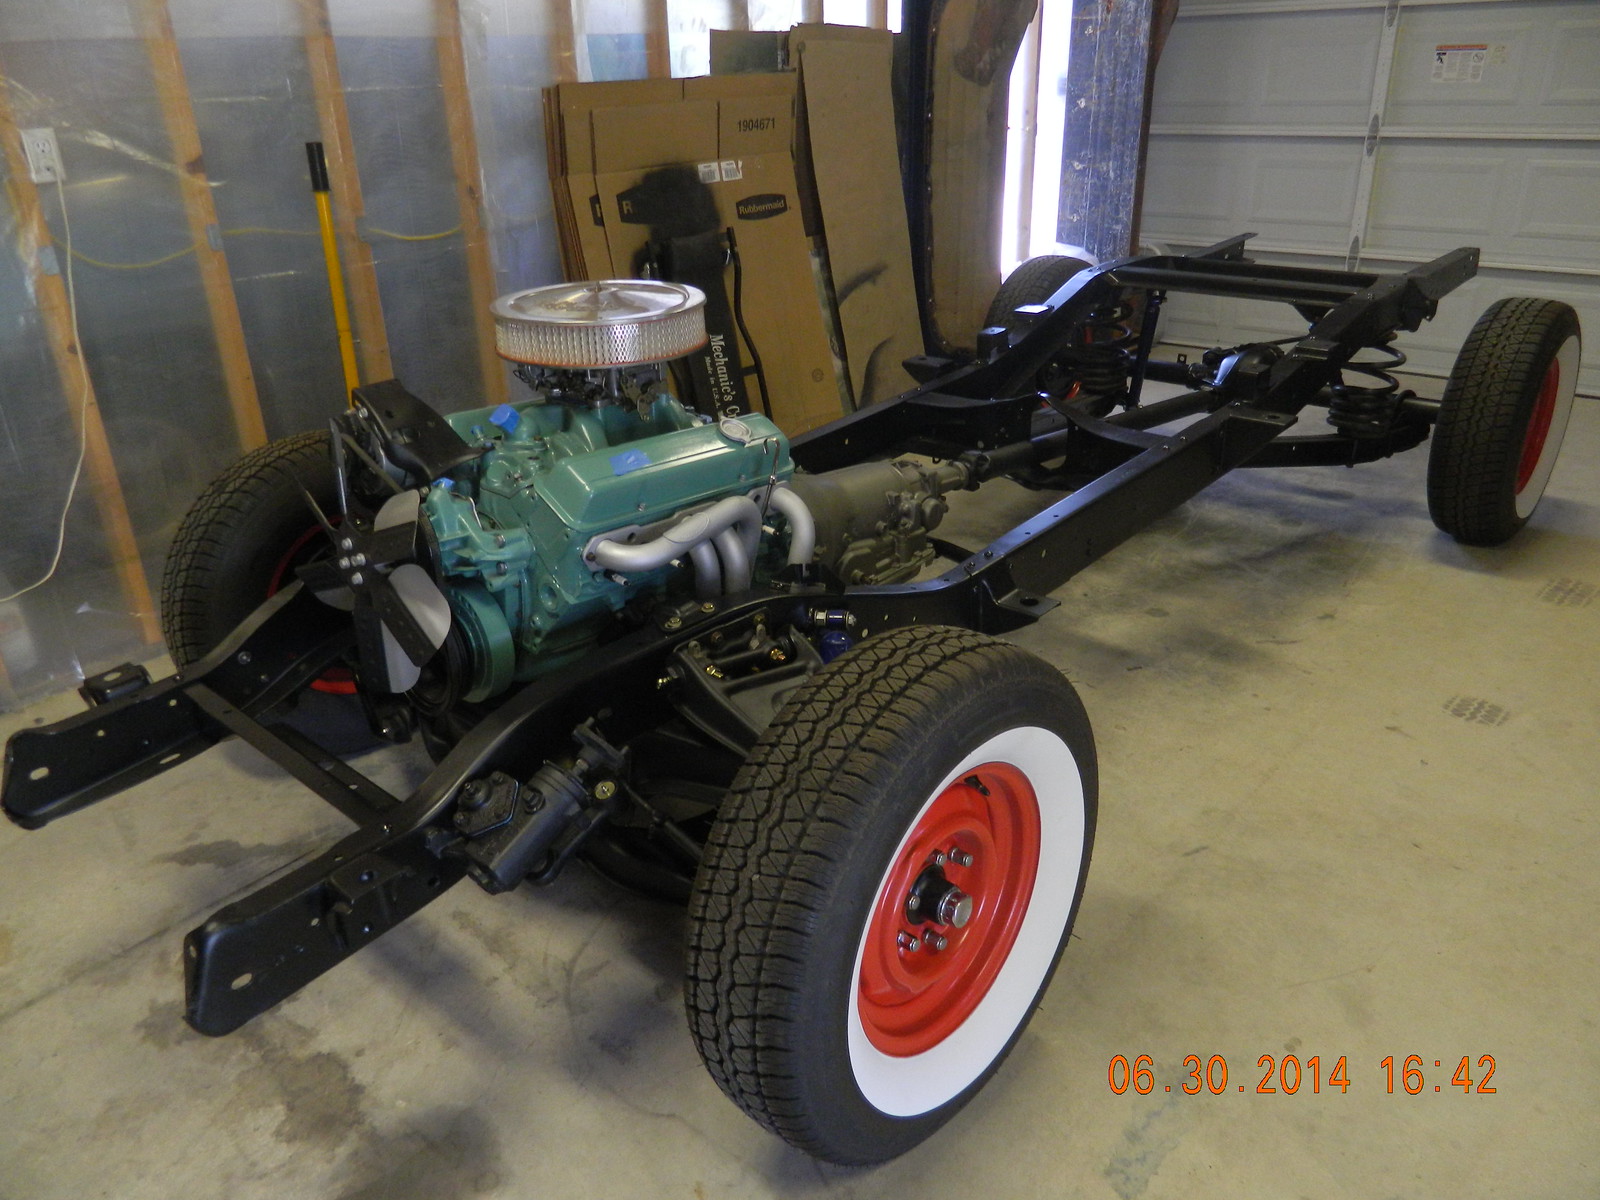
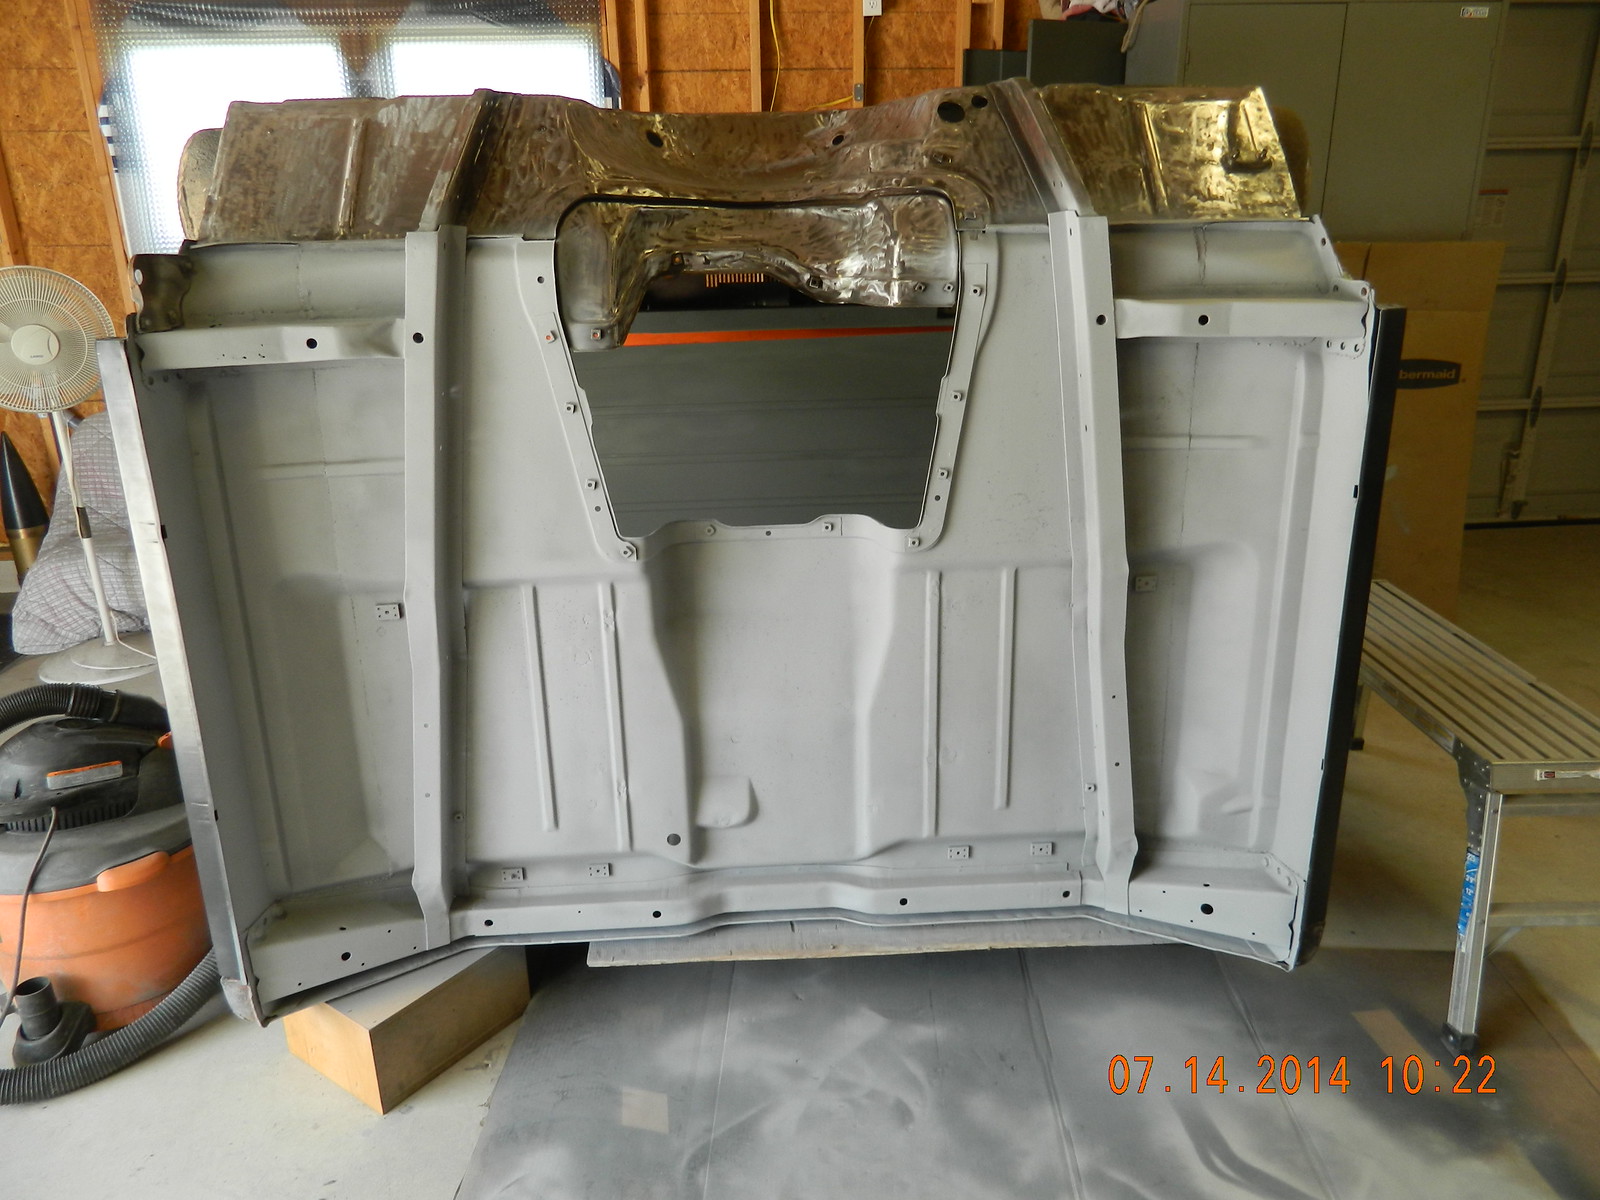
Thank you Bret, Yes I stumbled on one of the links you had given me some time back and had a look through the Chevy site at your ground up restoration of your father-in-laws old 64 pickup "Blue Jay", you are sure putting a whole heap of time, effort and work into that truck; I now know why your woodworking tools are just gathering dust and not sawdust.... Top looking ute when it's finish, send a heap of photos please and post some on the forum too, thank you. Cheers, Peter Originally Posted by bj383ss

-
20th July 2014, 12:03 AM #11
Senior Member
- Join Date
- Jan 2014
- Location
- Washington State, USA
- Posts
- 329
-
20th July 2014, 08:13 AM #12
Deceased
- Join Date
- Mar 2013
- Location
- St. Helens Tasmania
- Posts
- 2,222
Honestly Crowie you can already see it's a Peterbilt.
Brilliant stuff mate.
Luvin It
Trev.
-
20th July 2014, 08:20 AM #13
GOLD MEMBER
- Join Date
- Nov 2008
- Location
- Canterbury UK
- Age
- 67
- Posts
- 2,617
-
20th July 2014, 10:26 AM #14
Hotrod
- Join Date
- Jun 2010
- Location
- Leander, TX Central Texas Area
- Age
- 45
- Posts
- 496
Heres a sneak peek. I now have a rolling chassis and have started finishing the rust and body repair on the cab so I can get it back on the frame. Originally Posted by crowie
-
20th July 2014, 12:40 PM #15
Senior Member
- Join Date
- Jan 2014
- Location
- Washington State, USA
- Posts
- 329
Bret,
You need to start a thread on this "toy" you are building. I'd like to watch it.


 Reply With Quote


