

 Thanks: 0
 Likes: 0
 Needs Pictures: 0
 Picture(s) thanks: 0
Results 1 to 13 of 13
-
9th August 2009, 10:06 AM #1
 Intermediate Member


- Join Date
- Jul 2009
- Location
- Rochedale Qld
- Posts
- 11
 Help! needed building a sturdy plinth for my new drill press
Hi! after ~30 years of service my small Betts GMF drill press has worn out. The best value replacement I could find was a Trade Tools bench press. It dwarfs the old one with the chuck some 30cm further from the bench top. I have to stand on a milk crate to centre the drill on the work piece.
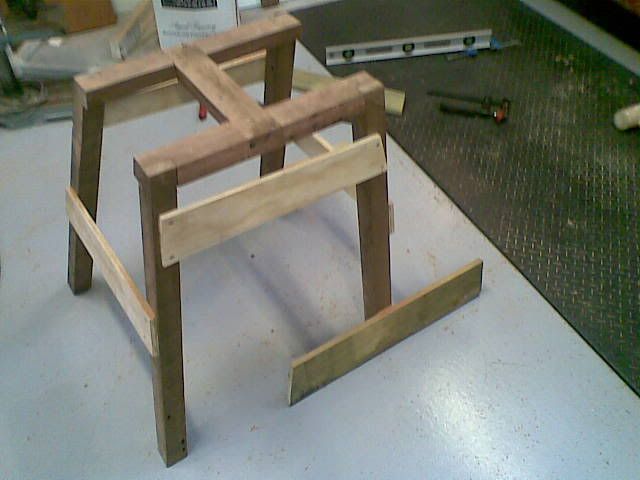
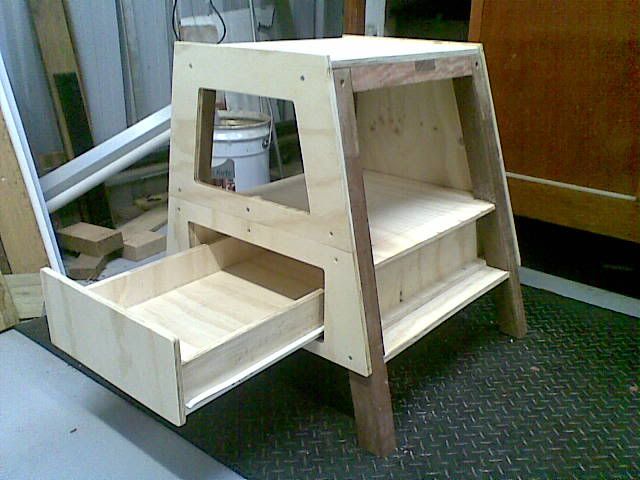
I need to build a 600mm high plinth to mount it on. I figured; hard wood legs and frame, clad in 12mm ply for rigidity, with a truncated pyramid shape at the back and sides to give it a wide stance (maybe with a couple drawers built in). I dont want to bolt it down. I want to sit it on rubber pads.
Trouble begins when I try to work out the joinery, its all compound angles. While Ive got the compound drop saw to make the cuts, Ive got no experience of this sort of joinery, nor any real idea of what joints or layout to use.
Help please! Has any one seen plans for something of similar shape or design that might get me started
-
9th August 2009, 10:13 AM #2
Senior Member
- Join Date
- Feb 2009
- Location
- ACT
- Posts
- 86
I think you've answered your own question, "truncated pyramid, clad in ply etc etc".
Lay the bits of wood out, clamp it when it look good and scribe your cut lines. You know you can do it!So many ideas........so little skill........
-
9th August 2009, 07:21 PM #3
GOLD MEMBER
- Join Date
- Oct 2003
- Location
- Sydney,Australia
- Posts
- 2,030
I'd suggest just making it a cube & putting some drawers in the base so you can store your drill press accessories in the top drawer (bits, vice, clamps etc) and use the bottom drawer/s to store hardware in plastic jars etc.
I made one for my tall pedestal drill that has wheels. I made a removeable top section with 4 drawers on ball bearing slides just in case I need the extra depth at a future date. The base is 600x600 of 16mm ply with some pine studs glued & screwed on top, the lockable casters are screwed thru' both layers and the pedestal base is bolted thru the ply in the middle, so even tho' the original base is raised I actually have a more stable platform.
I left a narrow ledge on 2 sides that the top box (also 16mm ply) sits on - I was planning to drill 2 holes for locking pins but so far I can pull the whole assembly around & friction is enough to keep it together. I will need to pull the drawers out when I want to remove the top section. I posted some pictures on the Forum a year or so back if you want to look for them.
-
17th August 2009, 01:59 PM #4
Intermediate Member
- Join Date
- Jul 2009
- Location
- Rochedale Qld
- Posts
- 11
Hi! murry44 and bsrlee. I took your advice murry44 and just started. I searched and searched for the pictures you posted bsrlee but couldn't fine them.
Anyway it's taken since the 9th for me to be approaching the screw and glue stage for my plinth. I've made some tactical errors, some straight up botches and learned quite a few lessons making the thing. Not the least of which is that I still cant use a tenon saw freehand. I'm starting to appreciate the advantages and accuracy of the router table and drop saw ...
-
17th August 2009, 05:23 PM #5
GOLD MEMBER
- Join Date
- Jul 2006
- Location
- Port Huon
- Posts
- 1,917
Might be too late if you already have screwdriver in hand, but here's a calculator for working out compound angles.
Geoff
The view from home
-
17th August 2009, 06:41 PM #6
Intermediate Member
- Join Date
- Jul 2009
- Location
- Rochedale Qld
- Posts
- 11
@ snowyskiesau, thanks heaps, it's never too late to have a resource like your link. I knew I should have paid more attention in geometry but the devil made my mind wonder off some where. I guess that at some point, I’ll need to gain a proper understanding of the math but your link will save much brain strain even when I do gain enlightenment … Cheers!
-
24th August 2009, 10:30 PM #7
Intermediate Member
- Join Date
- Jul 2009
- Location
- Rochedale Qld
- Posts
- 11
So to close the loop on this post, I've finished my latest piece of shed furniture, the drill press plinth.
Looks a bit like an old valve radio box, but I can tell you it's pretty rigid. Tomorrow it gets it's burden.
A couple of images by way of explanation of how it went together:
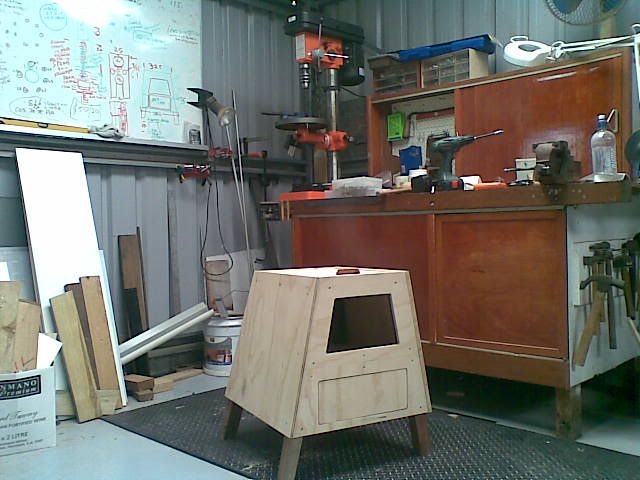
Please note the "monster" drillpress, currently bolted down where the old and deminutive one lived for almost 30 years.
Thanks Murray44, sometimes you just need someone to say; " ... just do it!"
Last edited by VernJ; 24th August 2009 at 10:37 PM. Reason: Spells, syntax, images
-
3rd September 2009, 10:55 AM #8
Skwair2rownd
- Join Date
- Nov 2007
- Location
- Dundowran Beach
- Age
- 76
- Posts
- 694

There ya go. Easy, wasn't it?

-
6th September 2009, 02:56 PM #9
Casual Hero and Philanthropist
- Join Date
- Oct 2005
- Location
- Yass
- Age
- 65
- Posts
- 703
I like it Vern. Looks very functional.
Still enjoying the drill press? Would you recommend it?
Tex
-
6th September 2009, 08:01 PM #10
Intermediate Member
- Join Date
- Jul 2009
- Location
- Rochedale Qld
- Posts
- 11
Hi Tex ... I've gotta say it's much better than the old rattler it replaced. At $368 it was a comfortable amount of money for a big lump of machinery. There are some cheap sides to it; like it's sticky paper drill depth guage. I spent a while setting it all up square and I've been drilling 2&3mm pilot holes and counter drilling 5,9 & 10mm holes for my current project and everything seems to stay concentric (which is more than could be said for the old unit). The run-out at the 2mm drill tip is sorta acceptable and once it's in the work piece all seems pretty good. It's quiet, has plenty of grunt and it's comfortable to use.
Tex, I Iooked around most of Brisbane's trade suppliers, and I couldn't find a smaller press with the same build quality. I turned and rattled a lot of chucks and loaded up the rack and pinions trying to gauge runout and precission etc and it matched far more expensive machines. I am however thinking seriously about fitting a smaller precission chuck (it has a "driftable taper" to accept other gear which is a plus for a cheap machine). I was happy to spend $500~$700 but all I seemed to get for the extra dollars was an even bigger lump of machinary but little extra precission.
So yes I'm happy and yes I would recommend it.
-
6th September 2009, 11:15 PM #11
Casual Hero and Philanthropist
- Join Date
- Oct 2005
- Location
- Yass
- Age
- 65
- Posts
- 703
Thanks Vern. I'll be looking to replace mine in the next few months.
Tex
-
13th September 2009, 10:00 PM #12
Senior Member
- Join Date
- Feb 2009
- Location
- ACT
- Posts
- 86
Vern,
Nice, I put a metal tray under my drill (on top of the plinth). The tray is about 350 x 400 and catches about 95% of the swarf. Keeps the floor much cleaner. So many ideas........so little skill........
-
14th September 2009, 08:37 AM #13
Intermediate Member
- Join Date
- Jul 2009
- Location
- Rochedale Qld
- Posts
- 11
@ Murray44 ... hey thanks I'll have a look at that, would be particularly usefull for heavy metal swarf, which can be so sharp and latches onto your shoes and thence into carpet waiting to be discover by bare feet ... Originally Posted by murray44


 Reply With Quote
