Results 1 to 11 of 11
-
28th October 2007, 12:06 AM #1
 Paving in Herring Bone pattern using bricks
Hi all,
I recently bought almost 4000 solid bricks from Austral to use as pavers. We could not get a paver with a rumbled edge for a reasonable price so we were steered to these bricks.
They will look magnificent when down and I was planning to do them in herring bone pattern.
Earlier this evening I decided to lay a couple of sq mtr to see how they will look and I discovered that I have a problem.
Being a brick the size is 230 x 110 where as a paver is 230 x 115. So when you lay the herring bone pattern it tends to creep and I keep getting ugly gaps because 2 widths is 220 not 230.
I laid another couple of mtr in brick pattern and it looks ok but the Minister for Finance and I do prefer herring bone pattern.
So have I missed something, is there a trick to it or can't it be done with bricks?
I have searched and not found anything that helps.
-
28th October 2007, 02:23 AM #2
 SENIOR MEMBER


- Join Date
- Apr 2005
- Location
- Sydney
- Age
- 64
- Posts
- 882

The brick doesn't have to be half as wide as it is long to do a herringbone pattern. You must be doing something wrong.
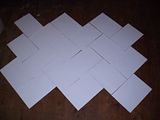
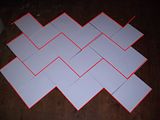
I've just laid out three courses of herringbone, using A4 sheets of paper. They are nowhere near being twice as long as they are wide. The second pic has each course highlighted red in photoshop:


Bear in mind that most bricks don't have the same tolerances as pavers, and their dimensions can vary. Especially with dry pressed bricks which is what you obviously have since extruded bricks have holes in them, and are unsuitable for paving. It's not uncommon for their length to vary between 225>235mm. This could be where you're getting in to trouble, especially with cumulative error.
If you have a look at the back side of a face brick wall, it's never as flat as the face which has been laid to stringlines and levels. There could be up to about a 5mm difference (or more) in the width of the bricks which cause some to poke out the back noticeably. A bricklayer works to a stringline indicating the top corner of the bricks on the face side of the wall, and the bottom edge of the bricks are often not perfectly in line. Bricks don't have to be manufactured to tight tolerances because there's ten millimetres of mortar between them which can be adjusted to take up any differences. It's a different story with pavers though.
To keep everything straight, and to prevent running out with a cumulative error, I'd recommend that you lay each course to a stringline, and sweep sand, or a sand/cement mix into the gaps. If you want to prevent weed growth, then there's a product that can be swept in, that sets and binds the pavers. I saw it on the forums here somewhere and I could search for it if you wanted.
-
28th October 2007, 02:20 PM #3

WOW John, you really went to some effort, Thanks.
I don't think I explained the problem properly or at least I left something out.
I get that it works as an un edged pattern and that all the outer bricks can be cut to make an even edge, either straight or curved but the problem is I wanted to start along the side of the garage and work in parallel to it.
Like the yellow lines in the first pic, either direction there is a continous line. (I took this at Austral Brick display centre - Horsley Pk)
Next I looked at your paper pic and this shows up what I am saying but in reverse, 2 widths are greater than 1 length but the effect is the same. You can't get a continous edge in either direction.
I know I can lay them at 45 degrees but I am trying to minimise the cutting seeing as it is about 90 sq mtr.
Any other patterns that use paving units at right angles to each other will have the same problems or worse.
Any ideas or just go to a running bond (which looks good too).
BTW John, I'm glad to see The Minister for funny walks replaced the smoking baby, the poor little guy would be pretty crook by now.
Thanks again for the trouble you went to with the reply.
-
28th October 2007, 02:37 PM #4

What I would do is lay them as a 45 Deg herringbone. Start your setout at the centre line of the drive - by the time you get to the outsides your creep wont be as noticeable as it would be through the centre.
Also cut in a soldier course every 3 metres (or so) and a header course on the outside to break up any visual reference lines, once you sand is swept in you wont tell.
-
28th October 2007, 08:54 PM #5
 SENIOR MEMBER


- Join Date
- Apr 2005
- Location
- Sydney
- Age
- 64
- Posts
- 882

It intrigued me, and I'm an expert at farting around.It doesn't work that way eh. Looks like you've got some cutting to do. Hopefully the offcuts will fit perfectly elsewhere as you go. At least that would halve the amount of cuts.
BTs advice sounds good.
I knew that most people wouldn't care too much for my bubs, but I like to stick it to them sometimes. He might get a revival some day, but I've got a few more avs in storage to relieve the boredom.
Believe it or not, I do have more productive things to waste my time on, but I enjoy 'amusing' myself.
-
28th October 2007, 10:32 PM #6

Something worth working out is p-laying around with gap distances between pavers so that inbteween the 2 borders you can finish on either a half or full sized paver. Depending on the width of the area you are doing you could move your border 10mm either way so that overall, you will have many less cuts than if you finished on a 1/3 size paver.
Obviously you wouldnt leave huge gaps so it looks terrible, but it can work in your favour
-
29th October 2007, 01:31 AM #7
 SENIOR MEMBER


- Join Date
- Apr 2005
- Location
- Sydney
- Age
- 64
- Posts
- 882

That's what he's trying to do but the problem is that you can't do it using a herringbone pattern, with bricks instead of pavers. It creeps out on every course, and there's no straight lines anywhere.
-
29th October 2007, 03:26 PM #8

Running bond it is then! Thanks to all.
MMM - Now that means we discuss (argue) over which way to run it.
I'll deal with it. If she won't agree I'll just keep my legs crossed.
-
29th October 2007, 05:05 PM #9

Always run it across the drive...I know it means all those cuts.... but there you go, life wasn't meant to be easy.
If you run it down the drive you will get wheel ruts happening and if there is any slope you will get sand washing out the joints.
-
30th October 2007, 03:15 AM #10

Thanks BT, good advice but this is not a driveway. It is an entertainment area beside the garage and under an awning.
It is all foot traffic and the occasional wheelbarrow. Also it is on fairly flat concrete, so there is no way to get movement in the base. I'm really not fussed which way they go down looks wise I just don't want to make it a logistical nightmare.
-
30th October 2007, 10:07 AM #11

Sorry about that. well in that case look at the space and decide which way that you would like it to appear wider than it is...run your bond in that direction.
With rumbled bricks you can use a bolster to cut them or a hydraulic guillotine so its all fairly simple.
Similar Threads
-
Paving with bricks over concrete slab
By Chumley in forum CONCRETINGReplies: 14Last Post: 20th July 2007, 09:44 AM -
Bricks steps
By Theremin in forum BRICKWORKReplies: 11Last Post: 8th November 2005, 10:57 PM


 Reply With Quote


Bookmarks