

Results 1 to 15 of 16
-
21st March 2008, 08:54 AM #1
 Intermediate Member


- Join Date
- Mar 2008
- Location
- Tasmania
- Posts
- 0
 TAS Styx Rainforest Coffee table BURL
Hi
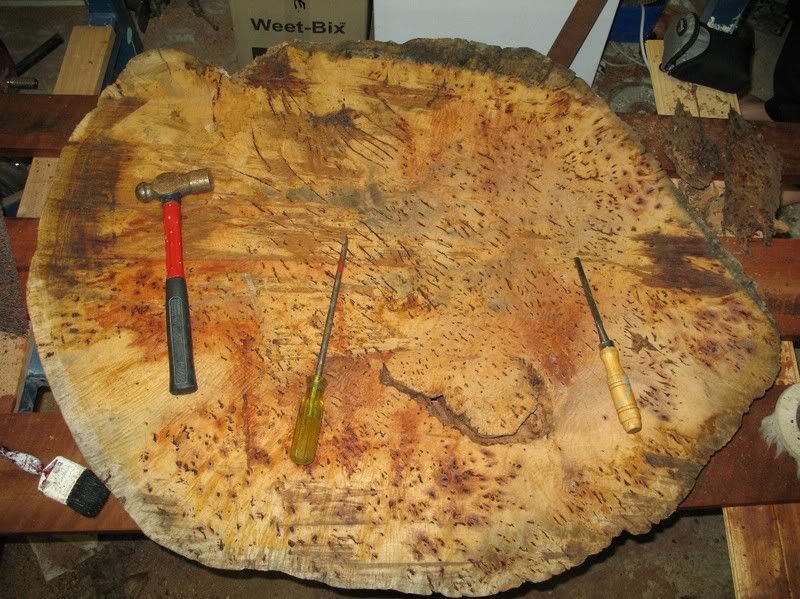
Im new to forum and a Carpenter but I have never done anything like this before. I want to sand and finish this Burl I purchased on Wednesday. Any advice on it would be appreciated.
Im still debating on whether to use Danish Oil or a Poly finish.
I noticed last night that it is very dry 90mm thick in places and looks as if it would absorb tons of oil or poly which it looks like it needs.
I want to use something that will protect it internally (absorb) but also protect it externally (provide a usable surface)
Any thought advice apreciated.
Tim

-
25th March 2008, 12:58 AM #2
GOLD MEMBER
- Join Date
- Mar 2003
- Location
- Newcastle
- Age
- 70
- Posts
- 41
Nice to see something of beauty salvaged from the Styx. You might consider pouring on a small amount of epoxy first to soak into cracks and fill voids. Clear epoxy would let you put some colour like gold leaf in that void in the middle. Dark epoxy will high-light the grain. If it runs through or soaks in too much then you do a few more pours. Then sand from 60# through to 400# with the ROS or by hand, vacuuming examining and filling with epoxy as you go. Then change to 400# wet and dry and flood with burnishing oil, sand all over wet then 800# then wipe off and burnish with a bit of hessian. That would look alright. The oil and wet and dry will go up to 2000 grit and with burnishing you can get a luminous surface. And what type of tree did this burl come from anyway ?
-
26th March 2008, 09:23 AM #3
Intermediate Member
- Join Date
- Mar 2008
- Location
- Tasmania
- Posts
- 0
Thanks Len, I didnt think anyone at all was going to reply. I wish I new what species it was, all I know is its Mountain Eucyliptus.
Ive being working hard on it and got it to a very nice finish. I used a little oxalic acid on it in a premixed danish cleaner as it had a water stain in it, it did work although not completely.
Ive purchased some fiberglass resin to fill the holes and need probably to fill all the birdseye holes and small cracks with it as well so i will probably cover the whole surface with it while doing this (I really hope it doest soak in too far so that I can sand it back easily) ?????
Ive finally decided on tung oil to coat it and have been trying to find it in its purest form without costing too much. I finally decided on Feast & Watson China wood oil (china wood oil is tung oil). I phoned the product help line yesterday and they tell me is 98% tung oil with a few modifyers to help it dry quick.
I still doupt its got that much tongue oil in it but it seems to be better than a lot of the other "so called" tongue oil products which seem to only have around 20%. After lots of phone calls, trips, returns and forum searches I finally settled on the Feast Watson product.
-
26th March 2008, 07:26 PM #4
GOLD MEMBER
- Join Date
- Mar 2003
- Location
- Newcastle
- Age
- 70
- Posts
- 41
I think that epoxy is better than resin but resin will work OK. You work it into the surface where it is weak, voids, cracks etc. Don't leave lumps of it above the surface. When it is cured take it off with the 60# grit and it will just sand off. With the tung oil it is good to thin it with gum turps or citrus turps at first. Let the coats soak in then wipe off the excess. Good luck with it. I'll be at the Sydney show for the next few days so I won't be checking this thread for a while but how about posting a photo when you get it finished ?
-
27th March 2008, 08:46 AM #5
Intermediate Member
- Join Date
- Mar 2008
- Location
- Tasmania
- Posts
- 0
Thanks Len, I will post photos, I managed to find a old twisted tree stump for the base but it is alot of work as it has dirt and bark over it and more holes to fill. I give it all a clean with the danish cleaner.
I also will have to make it more stable for a base to hold table up by placing some timber or thick slabs of clear perspex under it. I think perspex will be better as it will be unobtrusive and not detract from the stump (not sure what to with this yet).
Ill need a 4 litre filler and more tung oil. The epoxy stuff is expensive and I think Ill need a lot of it.
Thanks Tim
-
27th March 2008, 09:36 AM #6
Head Moderator
Sister of the DarkSide
- Join Date
- Dec 2004
- Location
- Toowoomba Q 4350
- Posts
- 3,491
Hi Timstools
That burl slice is going to look fantastic when you finish it. I hope you will post pictures of it and the stump table too.
Cheers
Wendy Box Challenge 2011 - Check out the amazing Boxes!
Twist One - Wooden Hinge/Latch/Catch/Handle
Twist Two - Found Object
Twist Three - Anything Goes
-
27th March 2008, 02:01 PM #7
Intermediate Member
- Join Date
- Mar 2008
- Location
- Tasmania
- Posts
- 0
Thanks Wendy it has been alot of fun also.
Last minute change of plan Im no longer going to do the top in tung oil as its just not practical (perhaps even impossible) due to all the little dips from the birdseye in the surface (would filler stay in these and would tung oil adhere to filler??). These will all need to be filled due to a potentual coffee spill on them.
The easiest way to do this is to use the one product to both fill and coat the burl slab in one application. The product Ive decided of is Epiglass HT 9000 Epoxy pouring resin 5 litre kit for $125.
It was recommemnded to me by someone who used it on a table slab in his boat with good success.
He said he filled the holes and covered the surface all in one application, it can later be cleaned with epoxy thinner and then re-coated with more epoxy or varnish to provide UV protection if desired. I didnt really want gloss finish but this seems to be the only practical way to do it.
Regards Tim
-
27th March 2008, 02:32 PM #8
 Manager tool buying
- Join Date
- Apr 2005
- Location
- Melbourne Outer East right next to mount dande
- Age
- 74
- Posts
- 0
dunno how hard the 2 pack is but you might be able to rub it down with steel wool to knock the shine back a little -
this will be a great looking piece ray c
ray c
dunno what's more fun, buyin' the tools or usin' em'
-
30th March 2008, 04:46 PM #9
GOLD MEMBER
- Join Date
- Mar 2003
- Location
- Newcastle
- Age
- 70
- Posts
- 41
If you sand through the grits after filling the big holes the birdseye will not be little dips. you should have a perfectly flat surface.
-
3rd April 2008, 04:23 PM #10
Intermediate Member
- Join Date
- Mar 2008
- Location
- Tasmania
- Posts
- 0
Yes
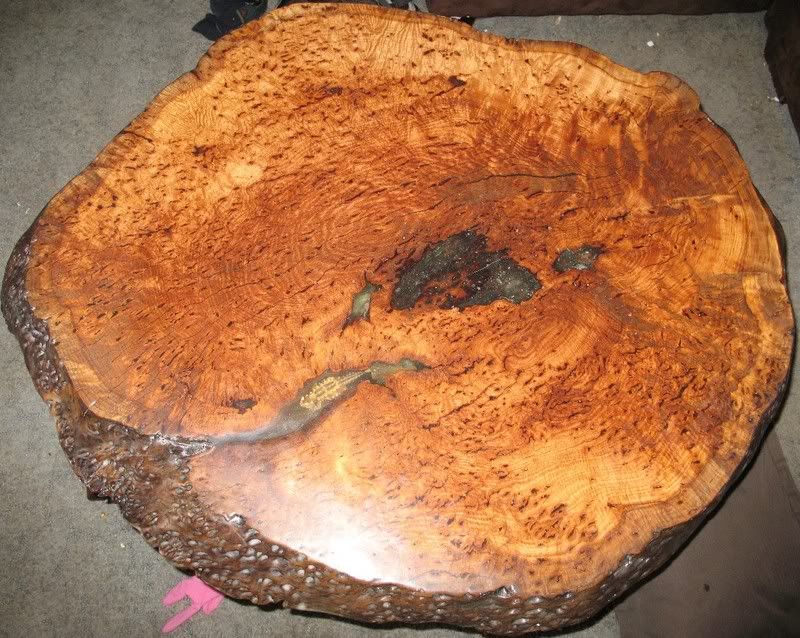
Filling the birdseye was a lot of time, many long hours standing by with a syringe full of epoxy trying to fill them while each time they drew in more. Most are now filled but a few will just have to be done with some silicon on the finished surface after the last coat.
I purchased some 0000 steel wool to remove the gloss appearance from the epoxy on the table top surface. At first I thought I would like the gloss appearance but i dont like it due to all the many reflections. It prevents me seeing the grain in the timber when sitting beside it. Not at all what i wanted. I may even get some tripoli powder if I knew it would do a better job? Anyone?
Tim
-
28th April 2008, 01:52 PM #11
Intermediate Member
- Join Date
- Mar 2008
- Location
- Tasmania
- Posts
- 0
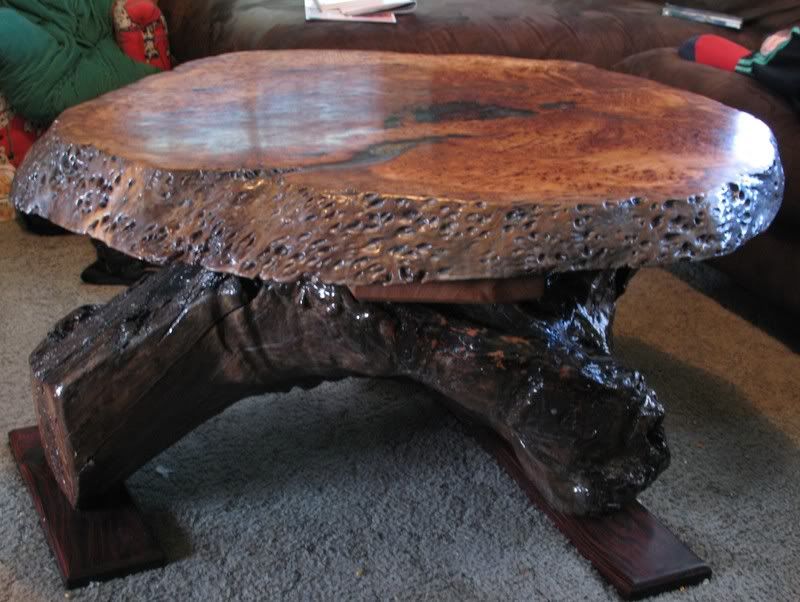
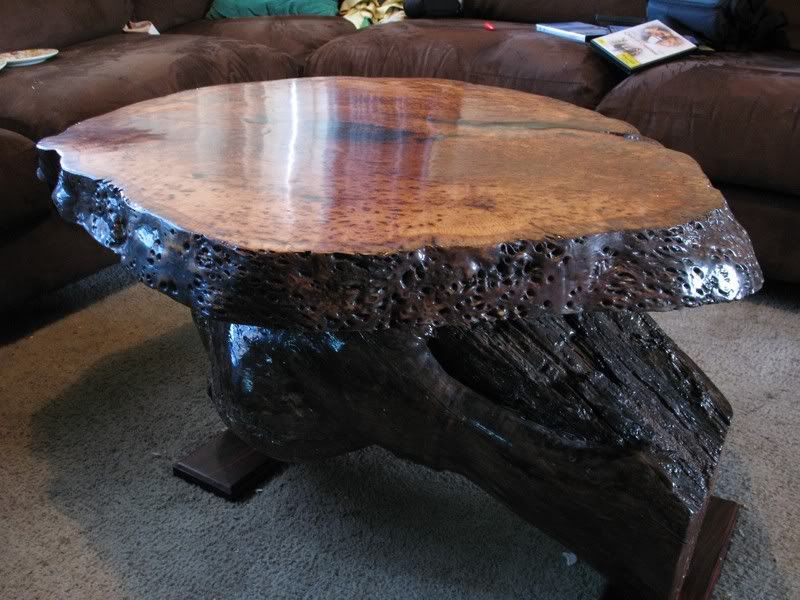
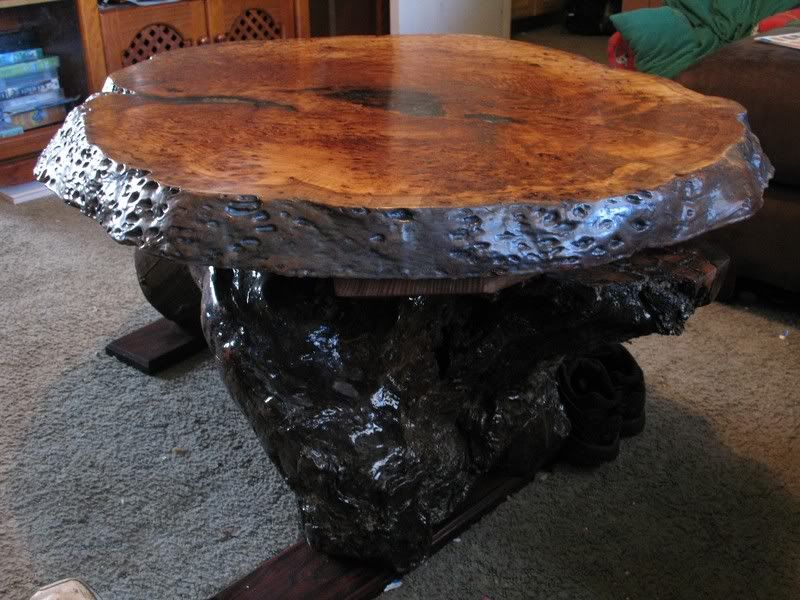
At last its all finished came up better than expected, my wife likes it too, I was considering selling it and doing another one although it would really be hard to replace this peice.
Regards Tim
-
28th April 2008, 02:02 PM #12
Head Moderator
Sister of the DarkSide
- Join Date
- Dec 2004
- Location
- Toowoomba Q 4350
- Posts
- 3,491
 Congrats! A great result. Did you end up 'dulling down' the shine a little? I agree that a sheen or satin would look good, allowing for the grain to show more.
cheers
Wendy Box Challenge 2011 - Check out the amazing Boxes!
Twist One - Wooden Hinge/Latch/Catch/Handle
Twist Two - Found Object
Twist Three - Anything Goes
-
28th April 2008, 02:06 PM #13
GOLD MEMBER
- Join Date
- Mar 2005
- Location
- In the shed, Melbourne
- Age
- 53
- Posts
- 0
-
28th April 2008, 02:09 PM #14
You've got to risk it to get the biscuit
- Join Date
- Jan 2006
- Location
- Canberra
- Age
- 32
- Posts
- 0
cool
S T I R L O
-
28th April 2008, 02:50 PM #15
Intermediate Member
- Join Date
- Mar 2008
- Location
- Tasmania
- Posts
- 0
Thanks
I got the burl and the log fromwww.tasmaniantimbers.com.au
Regards Tim
Yes I did but only on the top I left the gloss finish on the log under it because the gloss resin cascading down over some of the irregularities looks really nice, a little like a water stream trickelling over it.Did you end up 'dulling down' the shine a little?
Regards Tim

 Reply With Quote

Similar Threads
-
Redgum burl coffee table
By pepperjack in forum FINISHINGReplies: 0Last Post: 22nd December 2007, 09:23 PM

Bookmarks