

 Thanks: 5
 Likes: 0
 Needs Pictures: 0
 Picture(s) thanks: 0
Results 1 to 15 of 20
Thread: Planer/thicknesser
-
21st August 2016, 10:00 AM #1

 Senior Member


- Join Date
- Jun 2010
- Location
- Redbank Plains Qld.
- Age
- 64
- Posts
- 0
 Planer/thicknesser
Hi all
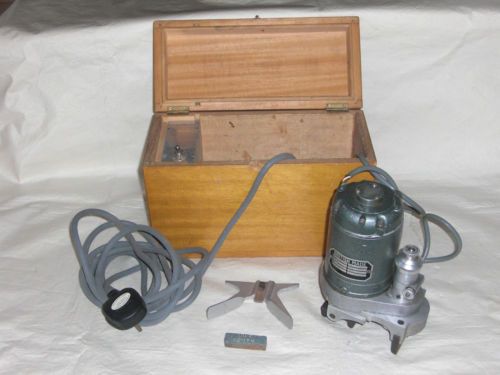
I have an old cast iron planer/thicknesser and wish to put the sharpened blade back in. I had the blade professionally sharpened as it had a few deepish nicks in it. If I drop the blade (about 290 mm long) into it's slot the blade would be showing less due to the sharpening. Now if I pull the blade, say 1.5 mm out to compensate for the sharpening, I would have to make sure the blade/knife is level so that the timber will be plumb when planed or thicknessed. I had a look at Carbatec stuff and for the very few times I would pull the blade out it seems quite a lot of money to invest (I am a vet pensioner) in a planer blade setting jig magnetic.
After this long story does anybody have any other easy ideas? Unfortunately I ask for easy as due to PTSD my patience level has been seriously compromised.

Many thanks
RogWith kind regards and may the wood chips fly
Islander
-
21st August 2016, 04:24 PM #2
Rusty doesn't mean its dead
- Join Date
- Dec 2010
- Location
- Melbourne, Australia.
- Posts
- 817
Hi Rog
If your machine is a thicknesser have you tried laying two equal blocks of timber on the lower bed and setting the knife in the head hand tight so it will move as the head is turned over the blocks thus allowing the knife to touch the block to achieve the correct distance or projection out from the cutter-head.
Here is a good example, yes it is a square head set up but the principals are the same ...
How to set knives in square head planer - Old Woodworking Machines
Melbourne Matty.
-
21st August 2016, 06:10 PM #3
Butcher of wood
- Join Date
- Jun 2010
- Location
- Bundaberg
- Age
- 54
- Posts
- 3,088
The cheapest jig that I know of is this: two sticks of hardwood with a rare earth magnet bonded onto one end of each and a brad nailed into the same face as the magnet. Dimensions are worked out to suit each machine; the only important bit is that both sticks be identical.
The idea is that with the machine set up as a jointer you lay the sticks on the infeed table with the magnet overhanging the centre of the cutter block. The brads are used as a gauge in that they butt up against the table edge when the magnet is above the cutter block. Now; with the blade loosely held in place in the cutter block the magnets will pull it up and hold it by the edge all nice, square and parallel to the infeed table. Then you just have to tighten the blade clamping mechanism. Rotate the cutter to the next blade and repeat.
If the sticks are a bit on the short side you either have to weigh them down with a handy brick or similar, or bury some more magnets into them so they stick to the table. A brick is cheaper though.
-
22nd August 2016, 07:33 AM #4
Senior Member
- Join Date
- Jun 2010
- Location
- Redbank Plains Qld.
- Age
- 64
- Posts
- 0
Knives and replys
Many thanks for the tips guys. I now know what next weekend is going to be about. setting the knives on my thicknesser.
Kind regards With kind regards and may the wood chips fly
Islander
-
22nd August 2016, 08:32 PM #5
Senior Member
- Join Date
- Mar 2014
- Location
- Beach
- Posts
- 163
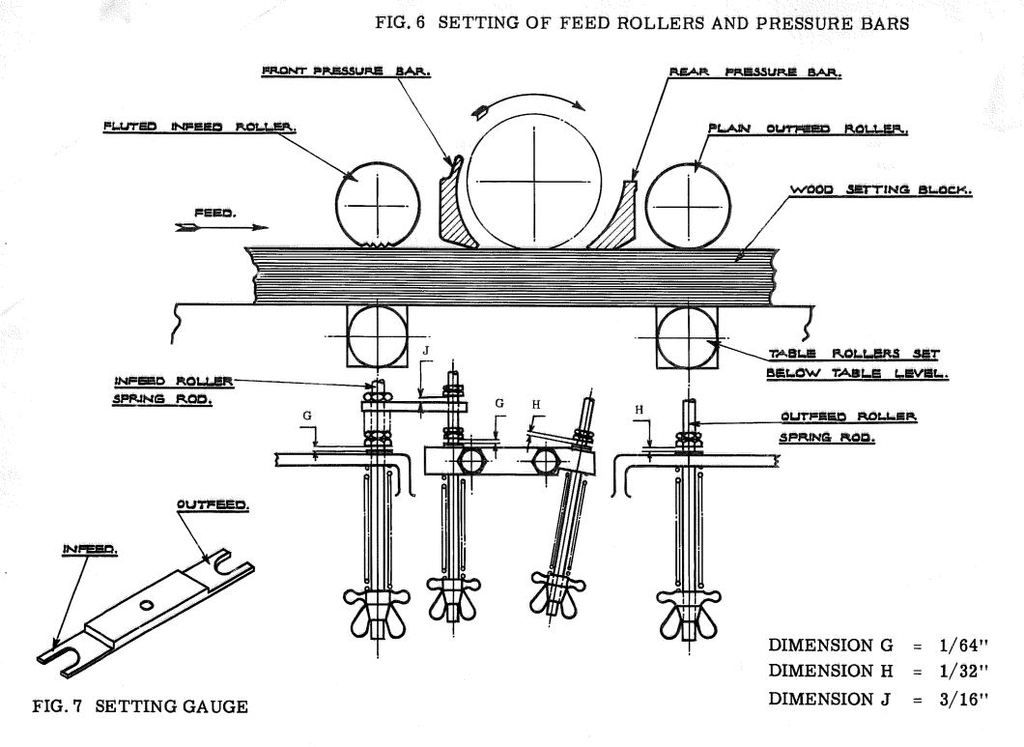
Once you set the blades then you have to make sure the indeed and out feed rollers, the pressure bar and the chip breaker are all set correctly as well. A bit more complicated than a jointer.
Those settings can be done with a gauge block and feeler gauges if you don't have any thing more sophisticated.
Planer%20Anatomy.jpg
Have fun,
Alli
-
22nd August 2016, 11:31 PM #6
Taking a break

- Join Date
- Aug 2008
- Location
- Melbourne
- Age
- 34
- Posts
- 5,906
Just to add to what the others have said, you should be going for about 1mm of knife projection; that's to say that the knives should stick 1mm out from the cutterblock
knife projection.png
-
23rd August 2016, 11:42 AM #7
HP of WT
- Join Date
- Jul 2009
- Location
- ottawa canada
- Posts
- 262
Allison has posted that powermatic planner set up with the pressure bar set above the cutting circle
 the good thing with that one is you never have a problem with the pressure bar any more because well there is no pressure powermatic has one with it below too. I am from the camp of below the cutting FWIW
I use longer blocks/Sticks mostly so I don't have to stick my head inside the thicknesser . I have at the ends run over the jointer the setting for bars and rollers . In other words if the bars and rollers are 1/16 lower I set my depth of cut on the jointer for 1/16" and run 4" on the ends specs will be in your manual so use the filler to set the jointer depth of cut on your machine . I Set the block/longer sticks to the in-feed roller on the joined end and rase the table/bed until it just kisses as I move it in and out . I lock off the table and then wedge up the rollers with another long stick and and slide the long stick under the head to the thick part for knifes . Than its just a knife job. For the over under I set the head to with in .001" of both the jointer and thicknesser tables(not cheating here with knife setting) and use the Burgess grinder that rides the head but I still use the sticks to set the bars and rollers . the Burgess has a knife projection gauge built in
All tools can be used as hammers
-
23rd August 2016, 08:57 PM #8
Senior Member
- Join Date
- Mar 2014
- Location
- Beach
- Posts
- 163
There are different approaches to the setting of the pressure bar. Having it just a couple of thou. above allows the finished material to approach the bed rollers and out feed roller but not be pushed up to high into the cutting circle which could cause problems.
Wadkin advocate setting the pressure bar a maximum of 1/64" below the datum and if that causes problems then it should be raised.
Yates, American, Buss, Oliver and Whitney all advocate setting the pressure bar at the datum, parallel to the cutting circle, as a maximum.
But Jack of course has his own approach and he sets the bar a full 4 Times lower than what Wadkin recommends as the maximum for its machines.
This would certainly put a lot of pressure on the material!!
Have fun,
Alli
-
23rd August 2016, 09:14 PM #9
Taking a break
- Join Date
- Aug 2008
- Location
- Melbourne
- Age
- 34
- Posts
- 5,906
SCM recommend a maximum of 2mm below the cutterhead for the outfeed pressure bar. As jgforsberg says, if the outfeed pressure bar is above the cutting circle, it will do nothing as it can't touch the timber to apply pressure
-
23rd August 2016, 09:59 PM #10
Senior Member
- Join Date
- Mar 2014
- Location
- Beach
- Posts
- 163
 Originally Posted by elanjacobs

2mm? Good luck with that
The pressure bar is there to act as a restraint on the material to keep it down on the bed as the leading edge starts to be pushed up after it passes the cutters by a series of factors.
The bed rollers on the out feed side
the weight of material still hanging out of the infeed side if it is much longer than the infeed table.
If the pressure bar is fixed a significant amount below the cutting circle then it is not putting pressure on the material it is actually blocking it. I guess with a powerful enough feed you could force it under but what does that do to the finish. Scraping 2mm off the cut surface with a blunt edged pressure bar doesn't sound appealing to me. Some modern machines use floating rollers instead of a pressure bar.
But I guess Wadkin and all those other manufacturers didn't know what they were doing for all the years they made machines.
Have fun,
Alli
-
23rd August 2016, 10:03 PM #11
Taking a break
- Join Date
- Aug 2008
- Location
- Melbourne
- Age
- 34
- Posts
- 5,906
Sarcasm doesn't add anything to your case. How about we just discuss it like adults instead of hanging s*** on what others have to say
I suppose I should add that the SCM pressure plate is floating/spring loaded, not fixed.
-
23rd August 2016, 10:56 PM #12
Senior Member
- Join Date
- Mar 2014
- Location
- Beach
- Posts
- 163
I'm sorry if you were offended.
So you provided an example of a pressure bar that could be 2mm below the cutting circle, which you then used to justify Jack's point and to claim that the pressure bars used by all the other manufacturers wouldn't work in fact turns out to be a totally different item. Exactly like the floating pressure rollers that I mentioned.
So this doesn't offer any support at all for Jack's idea, it supports what I have described as the role of the pressure bar, to resist any tendency of the leading edge of the timber to be forced up for a combination of reasons. The modern SCM machines have spring loaded rollers. Are you referring to a spring loaded bar or a roller? Either way it doesn't matter it still offers no support for Jack's position.
Have fun,
Alli
-
23rd August 2016, 10:59 PM #13
Taking a break
- Join Date
- Aug 2008
- Location
- Melbourne
- Age
- 34
- Posts
- 5,906
I'm referring to a spring loaded bar directly behind the cutter, but the rollers are spring loaded as well and all are set below the cutter. The machine I'm referring to is also about 45 years old, so not exactly modern
-
23rd August 2016, 11:23 PM #14
Senior Member
- Join Date
- Mar 2014
- Location
- Beach
- Posts
- 163
The rollers on the older machines like Wadkin et al (1960's and older) which are the era machines Jack is referring to, were spring loaded but the pressure bar wasn't, it was adjustable but fixed at whatever height was selected, so there was no give to it, which is why the manufacturers didn't recommend them being set any significant distance below the cutting circle. The diag. I posted earlier has the pressure bar set 2 thous. above the datum which would still allow any tendency for significant uplift to be resisted but still allow ready passage of material through the machine. The leading edge could only rise 2 thous. and then it was trapped between the out feed rollers.
The more modern spring loaded versions are obviously superior.
Have fun,
Alli
-
24th August 2016, 12:23 AM #15
HP of WT
- Join Date
- Jul 2009
- Location
- ottawa canada
- Posts
- 262
I wish i could take credit but am simple not that clever.
if woods hangs up the quick answer is to raise the bar out of the way and as i said that works to solve the problem of feed. Works good on big ruffing planers that have grinders that make the cutting circle small in service. a lot of the machines mentioned in fact have quick pressure bar /chip breaker adjustments so things stay in check when grinding in the head. for finish planing you drop the bed rollers this is were having the the rear pressure bar lower and fine tuned pays.
Oh funny how Wadkin call both front chip-breaker and back pressure bar pressure bars
If the feed snags the out board pressure bar it needs adjustment but there are 2 adjustments to make one for pressure and one for hight. The first should be to lighten the pressure assuming the planer bar hight is in spec. If it scraping is needs to be re-machined with a leading rounded edge and flat all the way across. Had to do this on mine.
All tools can be used as hammers

 Reply With Quote


