

 Thanks: 0
 Likes: 0
 Needs Pictures: 0
 Picture(s) thanks: 0
Results 16 to 30 of 31
Thread: Bifold Doors ?????
-
24th January 2007, 09:31 AM #16
 SENIOR MEMBER


- Join Date
- Apr 2005
- Location
- Sydney
- Age
- 64
- Posts
- 882

And this is another: -
Or this: -
Here is a way you can install the guide track at the bottom. This is obviously not to scale: -
Drill weep holes in the guide track so water can escape.
-
26th January 2007, 05:43 PM #17
Intermediate Member
- Join Date
- Aug 2005
- Location
- Sandgat4e
- Posts
- 37
Excellent that is such a help appreciate it. If we are going to hide the framing in the bulkhead does that mean we can just frame it all up with pine rather that using hardwood. Even better if so as we are tight on budget now so that will work really well.
-
27th January 2007, 04:39 AM #18
SENIOR MEMBER
- Join Date
- Apr 2005
- Location
- Sydney
- Age
- 64
- Posts
- 882
Use whatever rotten old rubbish you've got. So long as it's solid enough to hold the cladding and plasterboard in place, then you won't see it, and you'll be right. Just bear in mind that the track is carrying the weight of your doors, so if you're not going to waste your money on a Hyspan, then make sure you bolt the framework up with some booker bar, or strap it up to something solid with hoop iron stretched tight. If it carries your weight without deflecting at all, then it should carry your doors, no wuckers. Of course you'll want a decent continuous plate at the bottom that won't deflect too much. A nice straight 4 X 3 on the flat, strapped up to each stud, and the studs strapped up to something solid at the top, should do the trick.
-
1st February 2007, 06:46 PM #19
Intermediate Member
- Join Date
- Aug 2005
- Location
- Sandgat4e
- Posts
- 37
 hi again. Yey I finally got a refund from Cowdroy which was a relief and have just ordered the Centor stuff you pointed out and it only endend up being an extra $150 which I thought was pretty good.
Typical I decided to go with timber framing showing now god do I annoy myself honestly I change my mind that many times its not funny.
On the Centor stuff it states that the jambs should be 30 and the head 68 thick does that sound right I just wonder why the top part should be so big. Should i use Kwila for that or some other tlimber. l
Do you know what it is I think I just like to confuse myself,like its not hard enough as it is!!!!
-
2nd February 2007, 09:14 AM #20
SENIOR MEMBER
- Join Date
- Apr 2005
- Location
- Sydney
- Age
- 64
- Posts
- 882
Good move. Well worth the extra IMO. Originally Posted by pantotango

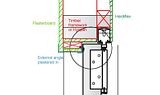
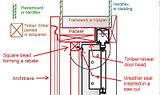
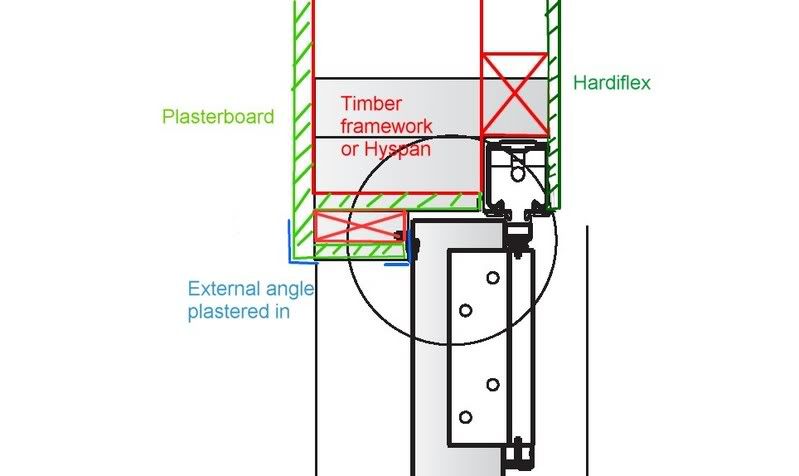
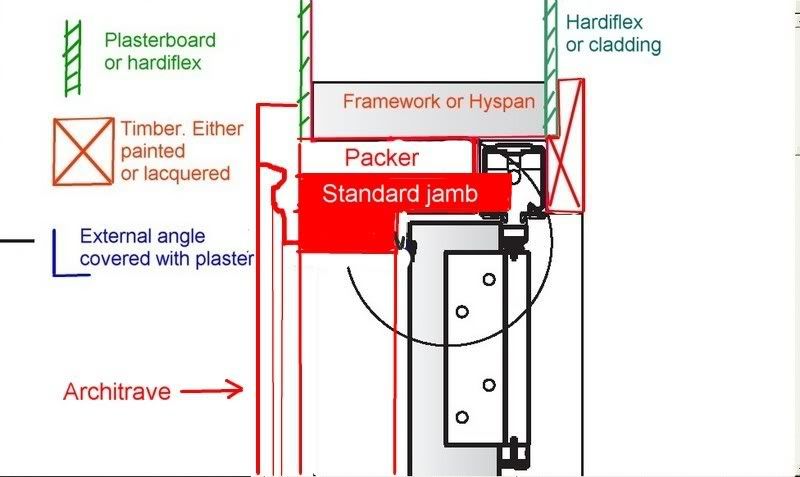
 In that case, if you want timber reveals and timber architraves, then I'd set it up with a door jamb that can either be one solid piece of rebated timber, or it can be made out of two pieces glued and nailed together. I'd set it up like this: - Originally Posted by pantotango
The only reason that they want 30mm for the jamb at the sides is so that the screws for the hinges will get enough purchase in the timber, so that they won't fall off. A typical standard jamb is only 19mm thick at the narrow part of the rebate, and that's fine to use, so long as the screws for the hinges go right through the jamb and gain purchase in the framing timber behind it. Originally Posted by pantotango
The reason that they want 68mm at the head could be for one of two reasons.
1. Perhaps that's the depth of the track, and with a 68mm thick head, then once the track is installed against it, it will end up flush with it and give a tight clearance above the doors. But if you have a look at my drawing, you'll see that it's unnecessary. You can just use a 19mm thick jamb piece and pack it down to the required height with cheap rough sawn framing timber since it's not going to be seen at all.
2. Perhaps they are referring to the timber above the track that supports it. The track carries the weight of the doors and the screws are being pulled vertically downwards. For this reason they need to be longer, and spaced closer together, and be screwed into something solid like solid framework, or the Hyspan that you may be installing. This timber doesn't have to be dressed feature grade because it's not seen at all.
You only need to spend extra time and money on the joinery that's seen in the end. Whilst a 68mm head jamb would work, it would have to be specially milled and it would be quite expensive.
Well if you've never hung a door, then installing a set of bifolds would be confusing. I'm happy to help as much as I can. If you run into any problems, then it may help if you post some photos of your situation. Originally Posted by pantotango
-
2nd February 2007, 10:08 AM #21
SENIOR MEMBER
- Join Date
- Apr 2005
- Location
- Sydney
- Age
- 64
- Posts
- 882
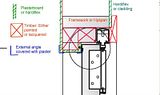
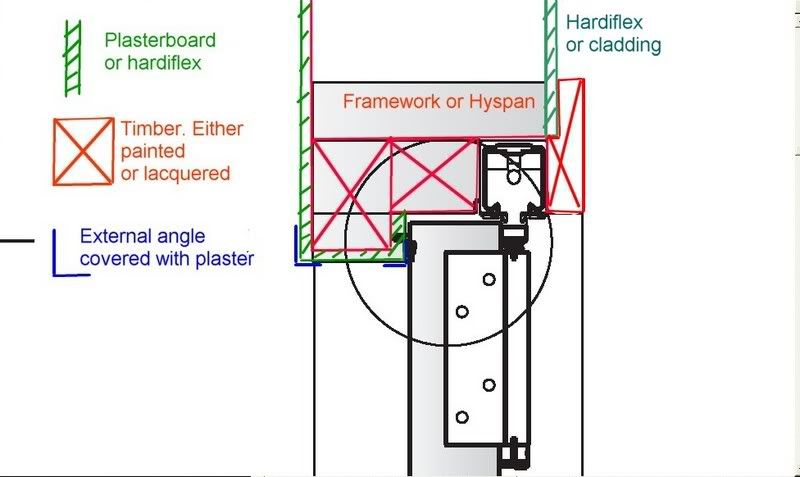
If you're using a standard door jamb instead of two separate pieces nailed together, then you'll find that they come in varying widths depending on the thickness of your wall. But the width of the rebate is usually always 38mm to suit the thickness of a standard door.
Because the position of the track at the top overlaps the door a bit, you'd have to plane down the jamb to suit.
You can see what I mean in this illustration: -

There's no track running down the sides, so you don't need to plane down the jambs there, but you may need to nail an extra strip on the edge, to suit whatever look and finish that you want on the outside where the walls are clad with whatever. You may want an architrave around the outside or you may not.
edit: - If you're using a standard jamb instead of two pieces, then it will be more difficult (but not impossible) to run a saw cut for insertion of the rubber weather strip. With two separate pieces you can run the saw cut before you nail them together. Alternatively you can just use the cheaper, adhesive stick on foam strip like I've used. Or you could just not bother about a weather seal in the rebates. Most peoples front doors don't have weather seals around their perimeter, but it's a good idea to put them in I reckon. It would give better insulation, especially if you're running air conditioning or heating.
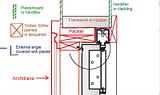
edit 2. You could save a few more $ if you wanted, by just using a small square bead to form the rebate instead of a full width piece. Just get a wider reveal than you need, and rip the bead out of one of the edges. : -
-
3rd February 2007, 07:22 PM #22
Intermediate Member
- Join Date
- Aug 2005
- Location
- Sandgat4e
- Posts
- 37
Hi thanks so much for that fantastic and once again greatly appreciated unbelievable advice.
I forgot to order the dropbolts when I ordered the tracks Centors are really expensive Ive found another place but non locking for only around $14 . Centor tells us we need 6. 3 locking and 3 non locking can we get away with all non locking. I cant figure out why we need them to lock.
-
3rd February 2007, 08:37 PM #23
SENIOR MEMBER
- Join Date
- Apr 2005
- Location
- Sydney
- Age
- 64
- Posts
- 882
I would have thought you’d need eight. I did but my doors are quite tall, so I put them top and bottom. None of mine are locking. Four of them (flush bolts) are concealed in the edge of the doors and you can’t access them unless the doors are unlocked in the middle. The star keys for the other four (mortice bolts) are also concealed in the edges of the doors, but even if you were on the inside and you had your own star key, you couldn't open them without first unlocking the concealed flush bolts. Of course I just used a just a cheap snib lock in the middle, so if you’re inside then you can unlock and open the doors without a key.
If your bolts are face mounted, and not concealed in the edge of the doors, then you’ll be able to open them from the inside, however if you use a sliding door deadlock in the centre, then you won’t be able to open them even if you disengage the bolts. A sliding door lock has a grabbing mechanism so you can’t separate the two middle doors, hence you can’t open them.
Of course anyone could make a simple bump key from instructions on the net. It opens just about any lock, and I’m sure that crims would be well equipped to break into almost any house. If you want to deadlock your entire house, then get a lock that can’t be picked with a bump key. Any flat key design can be bumped. The more expensive precision made locks bump open a lot easier than cheap sloppy locks. Get those expensive high tech combination locks and put them on all your windows and doors if you’ve got deep pockets. Of course, once they’ve checked that there’s nobody home by turning off the power at your meter box, and coming back a few hours later to see if you’ve turned it back on or lit any candles, then they could just cut and smash the glass with a blanket over it if they wanted to. Better install some bars or security shutters as well then.
Best bet is to install a decent alarm, preferably a back to base one with battery back up, and a visible flashing light on the eaves. A crim is likely to go for an easier target then.
-
7th February 2007, 10:39 PM #24
Intermediate Member
- Join Date
- Aug 2005
- Location
- Sandgat4e
- Posts
- 37
Phew touch wood we now have a frame with many thanks to you for all your excellent advice. We ended up getting a good deal on 30mm Kwila so thanks for the advice we steered away from the 68mm head and it all seems ok. Mind you not quite up to the track part yet thats still comming.
Im abit stuck now on how to figure out with the bottom channel. We want to try and avoid a sill due to budget and I prefer the look without them but if its easier then we would defnitley put one in.
Sooooo with the bottom channel at the moment in the opening we have particle board right up to the outside of the jamb eventually we are putting a deck up to the doors and I would like to run it all flush like yours. Do we need to cut some of the particle board back from the end of the joists and put the channel directly on the joists or does it go straight onto the particle with the floor butting up to it. The only thing is I think the channel is 26 mm and I wonder if it would then poke out above the flooring.
Hopefully Im explaining myself ok .Just abit stuck with how we figure that one out. If you like I can post a photo just cant do it for a few days as have relatiaves arriving from overseas early morn so no doubt will be busy there.
-
8th February 2007, 02:01 PM #25
SENIOR MEMBER
- Join Date
- Apr 2005
- Location
- Sydney
- Age
- 64
- Posts
- 882
I'm sure that you'll get detailed literature with the door track, but from their website it shows the set out for the bottom track: -
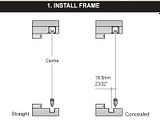
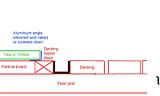
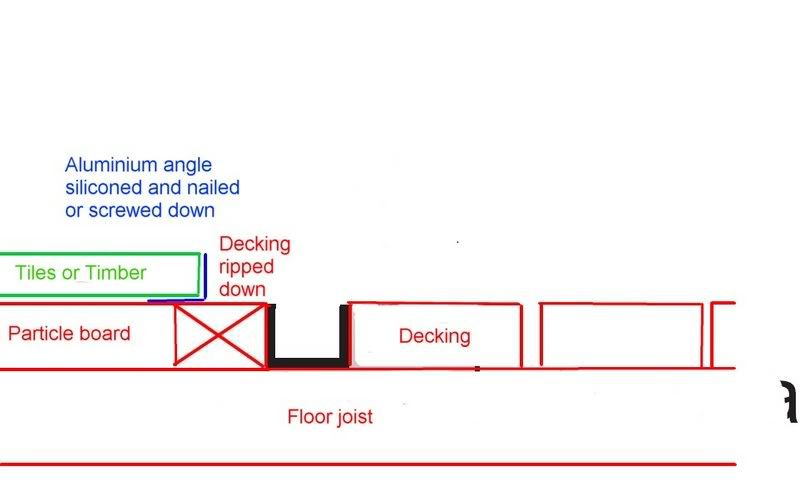
And this is how I'd do it if I was using particle board under my flooring inside: -
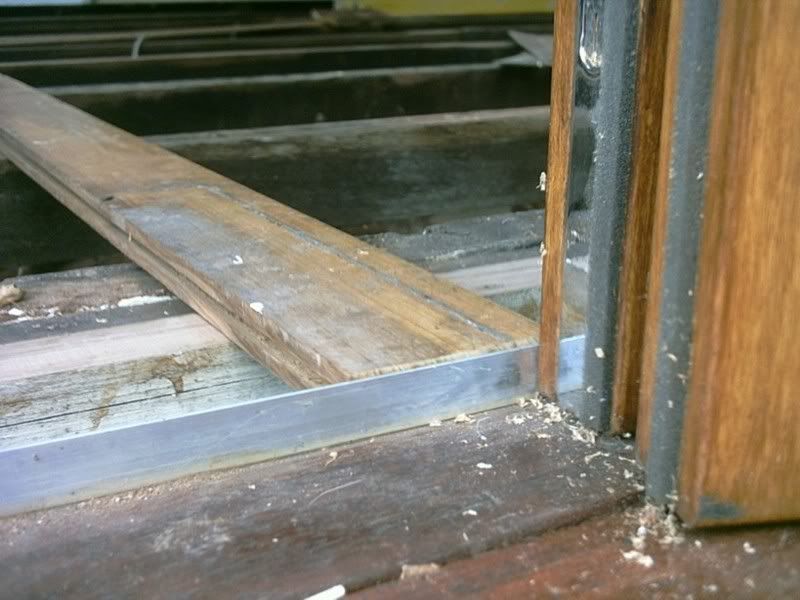
If I wasn't using particle board, then I'd set my internal joists 20mm higher than my outside joists. This is how I've set mine out with an aluminium angle nailed down to the decking board, for the doors to close against. I'm just leveling out the old floor joists ready for flooring. : -
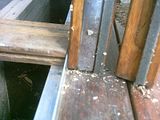
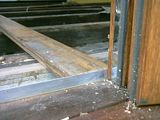
You'd want to have a step down for weatherproofing, but I suppose you could have the outside and inside at the same level. Without some sort of seal, you'd have wind blowing in there though.
If the track is 26mm deep, then I'd trench it into the floor joists so it ends up flush with the decking. You'll need a piece of decking inside the track to get to the face of the doors. I'd run it under the doors as I've shown, and use it to silicone, and nail an aluminium angle to.
-
14th February 2007, 07:36 PM #26
Intermediate Member
- Join Date
- Aug 2005
- Location
- Sandgat4e
- Posts
- 37
We now have all the tracks and the visitors have since left us in peace so now we have to put it all togeather.
Have decided after much humming and haahing that I prefer timber floors and worked out approx 15mm for that overlay stuff we can get soooooooo our particle board goes all the way to the outside of the house right to the end of the joists so does that mean to rebate the channel in that Im going to have to cut away some of the particle board to get it down enough for the flooring to go flush or should I cut away the particle board back to a point and then put some sort of timber packing on the joists to get the channel to the right height for it to be flush later. The particle is 18mm the channel is 26mm and the timber flooring will be around 15mm. Wee problem as Im not too sure if the flooring will be exactly that as Im hoping to get it from the auctions at a later date and it will all depend on cost at the time.
any ideas
thanks again
-
15th February 2007, 12:25 AM #27
SENIOR MEMBER
- Join Date
- Apr 2005
- Location
- Sydney
- Age
- 64
- Posts
- 882
Is it the Eclipse E2 Plus? Did you get it for a six door set up? Originally Posted by pantotango
Have you installed the outside joists? Have you framed up the opening? Is that the bottom track that's 26mm? Originally Posted by pantotango
If your joists are the same level then you'll end up with a step the thickness of the floor. You'll need to get an angle the same size. 15mm is OK. Are you allowing for underlay? You'll have to cut the floor back. The location of the cut will be determined by the thickness of the door, the positioning of your hinges, and the positioning of your jamb. Start with the outside position of your jamb. Are you putting architraves around the outside?
-
21st February 2007, 10:22 PM #28
Intermediate Member
- Join Date
- Aug 2005
- Location
- Sandgat4e
- Posts
- 37

wow what a week.weekend. Finally have the thing all framed up hopefully it is going to be ok looks ok.I went through all the track and bits and pieces and got it quite wrong the channel is only 19mm as opposed to the 26mm I thought it was so I figured we would just pop it straight on the partice\joists and then get the thicker floor to make it easier with an underlay then it should work out right.
So doors 1,2,3 have all the hardware on them and fingers and toes crossed we have done all of that ok very exciting to finally start and we now have to try and finish this weekend. So far it seems to be ok but who knows I guess when we hang them we will see.
So hopefully by Sunday arvo we should have them done and then can put a photo up.
Keep your fingers crossed
thanks so much for your help so far it really has been such a great help and I do think without it we would have ended up having to get a builder or someone to help so many many thanks
PS keep your fingers and toes crossed as well
-
22nd February 2007, 09:31 AM #29
SENIOR MEMBER
- Join Date
- Apr 2005
- Location
- Sydney
- Age
- 64
- Posts
- 882
-
3rd March 2007, 11:00 AM #30
Intermediate Member
- Join Date
- Aug 2005
- Location
- Sandgat4e
- Posts
- 37
 Wow here I am back again.
Guess what so exciting we have now hung three and they are perfect havent had to adjust them so touch wood the rest will go well. We did have one boo boo I forgot to allow for the channel to sit flush so ended up having to cut away some of the particle board to lower it into or the doors were not going to fit. The other 3 are hopefully going up today. Im just wrapped so far as they work beautifully . I can tell you though there was alot of stress ,arguements, standing around scratching the head but well worth it so far. Ill get a photo on soon to show you so far
Thanks once again could not have done it without your valuable advice.

 Reply With Quote
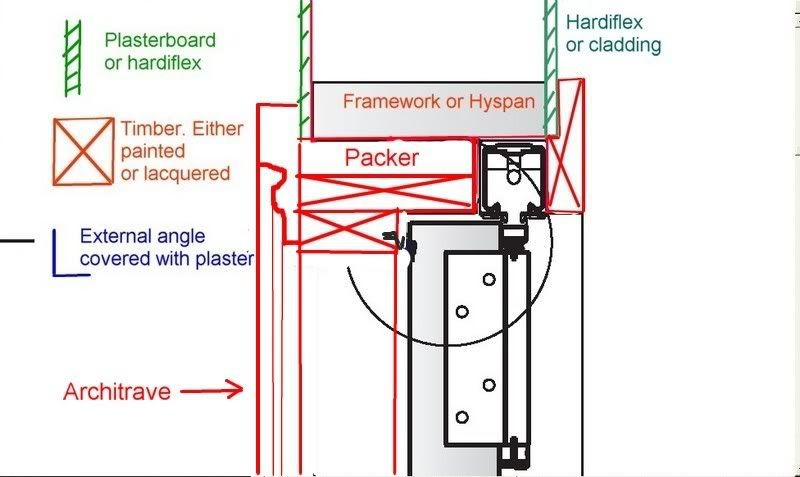


Similar Threads
-
bi-fold doors
By pawnhead in forum DOORS, WINDOWS, ARCHITRAVES & SKIRTS ETCReplies: 32Last Post: 13th November 2007, 11:15 PM -
Finishing or framing BiFold doors
By ptyltd in forum DOORS, WINDOWS, ARCHITRAVES & SKIRTS ETCReplies: 2Last Post: 30th December 2006, 04:33 AM -
Bifold doors No track Help needed !!!!!
By pantotango in forum DOORS, WINDOWS, ARCHITRAVES & SKIRTS ETCReplies: 9Last Post: 1st July 2006, 10:37 AM -
BiFold Doors
By vGolfer in forum DOORS, WINDOWS, ARCHITRAVES & SKIRTS ETCReplies: 11Last Post: 10th September 2005, 12:27 PM
