Results 1 to 7 of 7
-
23rd December 2020, 05:22 AM #1
 New Members


- Join Date
- Dec 2020
- Location
- France
- Age
- 32
- Posts
- 2
 Sanding plywood to remove Danish Oil
Hi everyone,
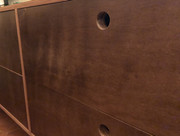
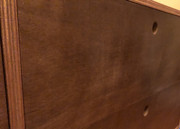
Here is my problem. I used plywood for a project, stained it (water based, so really easy to remove by sanding), and applied 4 coats of danish oil. Until the last coat, everything was fine, but after the last one, weird shiny wide lines appeared, visible from a certain angle only. I would like to start over the finish.
My question is : knowing that I used plywood, can I sand my piece to get the bare veneer back ? I'm a little afraid of sanding through it...
Thank you !
-
23rd December 2020, 05:25 PM #2
 Taking a break

- Join Date
- Aug 2008
- Location
- Melbourne
- Age
- 34
- Posts
- 108

Before you try to get it back to bare timber, maybe try sanding it with 800 grit paper and a bit of oil to try to blend the lines out.
If the plywood has thin veneers, I don't think you will be able to get to bare timber without sanding through the top layer because the oil doesn't sit on the surface, it's absorbed into the wood. The shiny lines might be the growth rings showing through if the the top ply is saturated with oil (it can't penetrate through the glue to the next layer).
Can you post a picture?
-
23rd December 2020, 06:52 PM #3
 New Members


- Join Date
- Dec 2020
- Location
- France
- Age
- 32
- Posts
- 2
-
23rd December 2020, 10:04 PM #4

Weird shiny lines you’re referring to, are natural grain lines in the timber veneer.
Cheers
DJ
ADMIN
-
23rd December 2020, 10:41 PM #5
 Taking a break

- Join Date
- Aug 2008
- Location
- Melbourne
- Age
- 34
- Posts
- 108


I don't see anything weird there, just some wavy grain.
-
24th December 2020, 12:30 PM #6


I agree, just the wonders of working with a manufactured product produced from a natural material. Sanding to remove the DO is not an option, for the reasons given, its a penetrating finish, not a film finish.
The edges of ply present both face grain and end grain in the alternating ply layers. The "grain" and "cut" of solid wood or veneer determines whether face or end grain or a complex combination of both is present in the face of a board or veneer. Flame, curly, burl, whitebait, compression figure grain present both face and end grain areas on a surface. Those "patches" of the surface "take up" the DO at vastly different rates. It is easy to flood the face grain, but near impossible to flood the end grain, so the end grain will always look dull or flat. Penetrating stains and finishes will always present these application challenges.
For the face grain drawer fronts the species of wood used, and the "cut" of the veneer, for the face veneers will determine how the DO looks and how the material will "take up" a stain or penetrating finish. Rotary or peeled; crown / rift / quarter / semi-rotary cut veneers all present a different aspect of the woods grain. The nature of the wood, porous, dense, early / late grain growth rings, resin bands, inclusions, etc all modify the "take up" of a penetrating finish. Simply the wonders and challenges of working with a non-homogeneous material - wood! DO may take considerably longer or may never fully cure in patches or bands on some particularly resinous woods.Mobyturns
In An Instant Your Life CanChange Forever
-
24th December 2020, 03:13 PM #7


Hello Aurelius-13
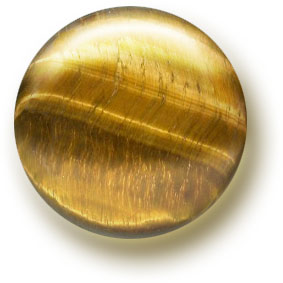
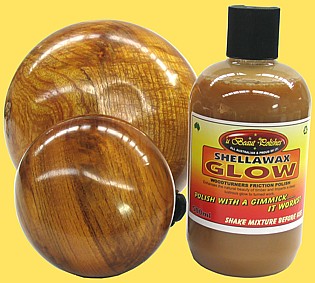
What you're seeing is called chatoyance (also cats eye or opalescence) as per Tiger Eye semi precious gem stone below. In timber/wood it can be subtle as in your piece of ply or over the top as in fiddleback piece shown to the right of tiger eye. (sorry about the big pic) It is caused by the rays of the light hitting the the wavy grain found in stressed wood, the light rays are reflected back out giving the illusion of depth and movement as it can appear to move when viewed from different angles or positions.
It is not a fault in your finish or the timber. It is a natural phenomenon/highlight in your veneer. It is also something that is highly sought after in many areas of furniture and woodturning. If you don't want it you have to choose a pierce of dead bland straight grained timber.
No amount of sanding will remove it. If anything finer sanding may highlight it even more. That's if you can afford the amount of clogged up abrasive it will take to remove the DO.


Our friction polishes are renowned for bringing out chatoyance in turned work even in dead pan radiata pine. Couple of pics below:


Cheers - Neil KEEP A LID ON THE GARBAGE...
 Report spam, scams, and inappropriate posts, PMs and Blogs.
Use the Report icon at the bottom of all Posts, PM's and Blog entries.


Similar Threads
-
how to darken or tint Danish Oi?_ how to use danish oil as a grain filler? Potassium
By agent86 in forum FINISHINGReplies: 2Last Post: 10th July 2013, 09:59 AM -
Wet sanding Danish Oil into Redgum table
By Lockwoodsman in forum FINISHINGReplies: 7Last Post: 6th June 2012, 04:04 PM -
Can I remove sanding sealer then stain and reseal?
By SteveH in forum FINISHINGReplies: 0Last Post: 5th September 2002, 10:43 AM


 Reply With Quote


Bookmarks