Results 1 to 15 of 27
-
12th March 2017, 10:21 AM #1
 GOLD MEMBER


- Join Date
- Mar 2008
- Location
- Townsville, Nth Qld
- Posts
- 102
 Best finish to preserve spectacular grain?
I am very fortunate to be given some pieces of red oak and northern silky oak with spectacular grain and rays that I intend using for a feature lid on two keepsake boxes.
When the timber is wet with White Spirits, and held to the light, they both had a deep clear 3D appearance that I would like to preserve with a suitable finish.
Normally I would use Kunos #244 oil, but not sure if an oil finish would preserve the deep appearance once it seeps down into the timber.
Can anyone please suggest the best way to finish this lid ? Oiling, polyeurethane, lacquer, burnishing, whatever?regards,
Dengy
-
12th March 2017, 12:03 PM #2
 GOLD MEMBER


- Join Date
- Jun 2005
- Location
- Townsville. Tropical Nth Qld.
- Posts
- 0

The best finish I have used is sand to 400 grit with sanding sealer then multiple coats of Wattyl Stylwood 90% gloss.
Rgds,
Crocy.
-
12th March 2017, 12:05 PM #3
 GOLD MEMBER


- Join Date
- May 2011
- Location
- Albury
- Posts
- 279

Definitely not polyurethane. I find a hard burnishing oil works well. I sand the raw timber to at least 400 grit then always use a sanding sealer, generally diluted shellac or Feast Watson Proof Seal (Proof Seal is totally clear so imparts no colour to the raw timber), then lightly sand to at least 600 grit. Then a coat of Feast Watson Fine Buffing Oil applied with 0000 steel wool. When it goes tacky buff off, leave it for 6 hours or so to harden then buff off with a clean cotton cloth (old toweling works well) making sure that you buff hard enough to generate some heat (hard work!). For an even finer finish go over this with U-Beaut EEE-Ultra Shine (more hard work). You'll find the grain and rays of the timber will 'pop' after buffing off the Fine Buffing Oil and once you apply the EEE it's like you're looking 'in' to the timber. Finer grits and wet sanding an initial coat of oil should result in an even finer finish.
Not saying this is the only or the best finish for what you're trying to achieve, but it is relatively easy, you don't need any special equipment and the result is very pleasing. Works for me. This method may also work with Kunos Oil, I don't know I've never used it. It's very popular though so it must have something going for it.
Neil's book 'A Polishers Handbook' is an invaluable source of info if you're looking for the ultimate finish - if all else fails.
-
12th March 2017, 01:43 PM #4

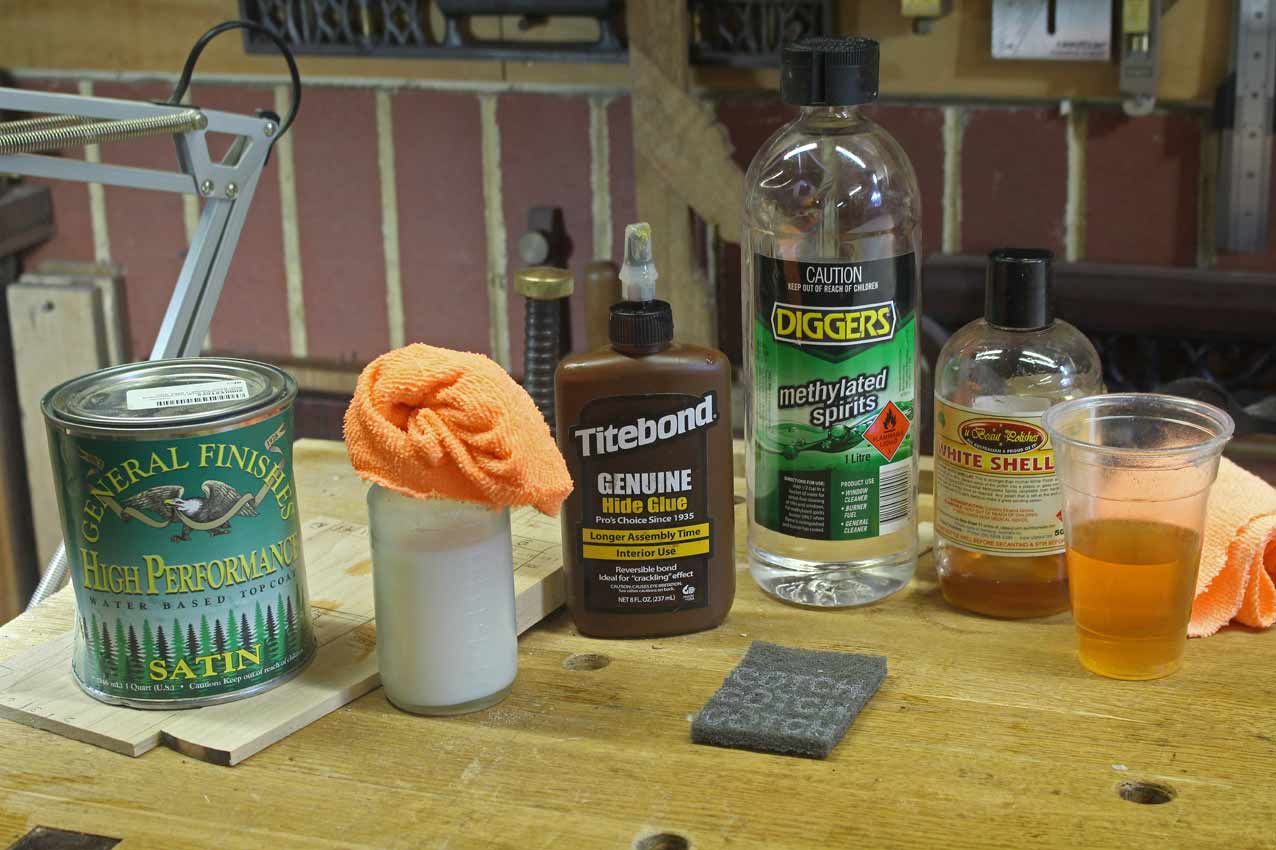
My recommendation is a 50-50 dilution of Ubeaut White Shellac. Wipe it on, let it dry (this is very quick), and rub down with grey (very fine) mesh. Apply a few coats this way.
The advantage of the while shellac is that it will not colour the wood, but will enrich the grain. Other shellac will add amber.
If you must have a protective coating - and shellac is so easy to repair if there is a scratch - then my recent experience building kitchen cabinets with a water-based poly may help. Unllike oil-based polys, it does not colour, and looks like it is not there. I rubbed it on. Personally, I would just finish withthe white shellac and wax.
If you do not mind a little amber - really, it is little - then my choice for a durable finish is Livos Universal Wood Oil, which is like a danish oil. Again wiped on. It is spectacular!
Regards from Perth
DerekVisit www.inthewoodshop.com for tutorials on constructing handtools, handtool reviews, and my trials and tribulations with furniture builds.
-
12th March 2017, 02:01 PM #5
 GOLD MEMBER


- Join Date
- Mar 2008
- Location
- Townsville, Nth Qld
- Posts
- 102

Thanks aldav, have just ordered Neil's updated book online.
regards,
Dengy
-
13th March 2017, 10:23 PM #6
 SENIOR MEMBER


- Join Date
- Jul 2004
- Location
- Adelaide
- Age
- 76
- Posts
- 425

Hi Derek, what is this grey very fine mesh you mentioned?
Regards
Keith
-
13th March 2017, 11:50 PM #7

Keith, it is the grey Scotch mesh in the photo below.

The results of using the above mix is here: https://www.woodworkforums.com/f9/han...ed-poly-211563
Regards from Perth
DerekVisit www.inthewoodshop.com for tutorials on constructing handtools, handtool reviews, and my trials and tribulations with furniture builds.
-
14th March 2017, 03:31 PM #8

Hi Dengy
An option is to sand to about 320 grit, give the surface a thin coat of sanding sealer and then use a grain filler to which you've added a stain to make the grain pop. For this purpose, Timbermate is NOT a grain filler.
Wattl used to make a proper oil based grain filler that could be dyed with Feast Watson's spirit stains, but I'm not sure if the product is still available. Applying it was a bit of work, but done properly you got a glass smooth surface that you then finished with your preferred finish. The finish could then be cut back and polished or left satin.
Essentially you want to fill the pores of the wood. this can be done with a stained finish -- once the pores are full sand back the surface so that most of the finish is removed. The idea is that the pores are full of finish, but the edges of the pores have at most 1 or 2 coats of finish. The effect also can be achieved with a burnishing oilregards from Alberta, Canada
ian
-
14th March 2017, 04:08 PM #9
 GOLD MEMBER


- Join Date
- May 2011
- Location
- Albury
- Posts
- 279

Thanks for that link Derek. Your method of applying and rubbing back water based poly is interesting. I've always brushed it and ended up with a very plastic finish. Wiping it on would appear to allow a smoother and thinner finish. I'll give this a go when I'm doing a piece where I'm looking for a hard wearing finish.
-
14th March 2017, 11:34 PM #10
 GOLD MEMBER


- Join Date
- Mar 2008
- Location
- Townsville, Nth Qld
- Posts
- 102
-
15th March 2017, 12:06 AM #11
 Visit www.inthewoodshop.com for tutorials on constructing handtools, handtool reviews, and my trials and tribulations with furniture builds.
-
15th March 2017, 01:04 AM #12

Gak! Finishing. This is the part that used to be my biggest bugbear.
This was until I had a good chat with Neville from Lilly Grace Boxes. Lilly Grace Boxes I follow his Facebook.
He uses a few very thin coats of sprayed water poly, fine sanded flat and matte, then rubbed-out polished. The results are incredible. His boxes are amazing and at no time does the result look plastic or synthetic.
Take a moment to view the work. It's worth it. There are many fine pictures.
Of note, I regularly use Kunos Livos followed by their wax, the Ubeaut hard burnishing oil, nitrocellulose, french polish with dexad shellac, poly and dead plain unfinished. My personal favourites are the Kunos for an unbeatable silky feel, nitro rubbed out for speed and now poly for its incredible thin lustre finish. I'm not a fan of French polish simply because I'm still not proficient after lots of practice
-
15th March 2017, 05:38 PM #13
 GOLD MEMBER


- Join Date
- Mar 2008
- Location
- Townsville, Nth Qld
- Posts
- 102

Thanks for the link WoodPixel, this raises more questions. The web site and work on the Lily Grace boxes is really outstanding.
How do you go about spraying inside a box with poly? Surely it runs everywhere?
Can you please expand on the process he uses? Being relatively new to anything but Wattyl 'Scandinavian' Oil and Kunos, I would appreciate a bit more detail to better understand.fine sanded flat and matte, and rubbed out polishregards,
Dengy
-
15th March 2017, 06:18 PM #14

Hi Dengy and all,
These pictures show projects finished in Organoil Hard Burnishing Oil. The procedure is simple and extremely resilient to water/wine/fluids in general, heat and stains. It is easily washed down with "Spray and Wipe", with no loss of its outstanding lustre. You can rejuvenate the finish (if or when you want to) in minutes. My Dining table was done some 5 years ago and hasn't needed help since then.Box_From_top_1.jpgIMG_0022.jpg
I shall upload another photo tonight which will show the resolution of fine detail in a board of highly figured Tassie blackwood and also in the same photo, a board of silky Oak.
The method is available at Damn Fine Furniture under the heading HBO pictures (I think).
IMG_0106 (1).jpg
Here is a photo of the lid for the box. It has a Tassie Blackwood frame and Silky Oak panel/infill. You would have to say that the resolution shown on both boards is extremely good. On the Blackwood particularly, you can see a variety of grain patterns. These include the straight fiddle back on the far right, through to the "stormy" patterns along the bottom board. Resolution of the silky Oak shows similarly clear patterns.
Regards,
RobLast edited by LGS; 16th March 2017 at 02:50 AM. Reason: More information
-
15th March 2017, 07:32 PM #15

Dengue, this post from the wood whisperer says all I could in a very concise way: 213 - Rubbing Out a High Gloss Finish - The Wood Whisperer
Its exactly the same thing I do for CA on pens, or for fixing a car panel on my beautiful old HSV when some *^%# dinks or scratches it at the shops. It's simply progressively finer sandpaper followed by polish.
My all-time favourite polish is Meguires Ultra Shine. It cuts to perfection and removes swirls and holograms beautifully, it's also fast, fool-proof and makes my hands smell pretty
I now line most of my boxes, but for those I don't that need poly, I just mask it off with standard car sprayers tape and paper. You can get it all at SupaCheapAuto.
LGS, I've a can of the HBO, plus seen it done first hand, but by golly I can't get it right! But I've seen it and it's magic.
Similar Threads
-
Finish on tight grain box - oil?
By headingwest in forum FINISHINGReplies: 8Last Post: 21st December 2015, 08:32 AM -
Which is the best finish to really bring out the grain?
By Mr. Lara in forum FINISHINGReplies: 8Last Post: 26th March 2014, 08:16 PM -
Grain filling with oil finish
By Ben from Vic. in forum FINISHINGReplies: 11Last Post: 10th April 2009, 03:32 AM -
End grain finish
By wattlewemake in forum FINISHINGReplies: 5Last Post: 26th November 2007, 04:00 PM -
end grain finish
By hoopy in forum FINISHINGReplies: 1Last Post: 17th May 2006, 02:19 AM


 Reply With Quote


Bookmarks