

 Thanks: 0
 Likes: 0
 Needs Pictures: 0
 Picture(s) thanks: 0
Results 1 to 12 of 12
Thread: Tool support for dry grinder
-
4th August 2010, 05:45 PM #1
 Retired Member


- Join Date
- Nov 2006
- Location
- Bendigo Victoria
- Age
- 80
- Posts
- 9,605
 Tool support for dry grinder
Having acquired a wet grinder and some jigs to sharpen, amongst other tools, wood turning chisels I decided that a tool support to use shape these on the dry grinder would be nice.
Having purchased a Jet tool support I set out to make a mount for this for the dry grinder.
Interestingly, the spacing of the arms on the Jet tool support is different to the Scheppach tool support, approx 90mm vs 100mm resp.
I started with some 22mm hex (12L14) for the mounting bushes and drilled/bored a 15mm hole in these.
The support arms are 12mm, and I decided that it would be nice to have these slide in a Delrin sleeve, so turned up some 20mm black Delrin to 15mm OD for a press fit in to the hex bushes, left the sleeves a bit longer to stick out the front.
Drilled and tapped a 6mm hole for locking knobs, these are off the Scheppach grinder.
As I didn't have any other knobs, and didn't want to plunder the Scheppach grinder, I turned up some brass knobs from some 19mm brass.
Here is what I have so far, Jet tool support with support bushes and brass locking knobs
Now to mount the support bushes on a suitable bar and make up the mounting block to set all this at the right height to the dry grinder.
-
5th August 2010, 12:20 AM #2
Be inspired. Be creative. Be bold.
- Join Date
- Apr 2001
- Location
- Perth
- Posts
- 9,037
Hi Fred
Will this help?
https://www.woodworkforums.com/f127/grinding-nirvana-101916/
Regards from Perth
DerekVisit www.inthewoodshop.com for tutorials on constructing handtools, handtool reviews, and my trials and tribulations with furniture builds.
-
5th August 2010, 08:13 AM #3
Retired Member
- Join Date
- Nov 2006
- Location
- Bendigo Victoria
- Age
- 80
- Posts
- 9,605
Yes thanks Derek, read that.

Did you get a chance to measure the distance between those mounting holes?
-
5th August 2010, 02:41 PM #4
Be inspired. Be creative. Be bold.
- Join Date
- Apr 2001
- Location
- Perth
- Posts
- 9,037
Hi Fred
My apologies for not getting back to you before now.
Measurements are arbitrary as machines differ in size. I assume that you are referring the to distance between the first and second set of holes. This is 40mm.
The thing is that I set up my upper tool rest so that there was room to use the Tormek angle setter to grind at a determined angle. Using Tormek's guidelines meant that there was not sufficient room below the guard. So I dropped the height slightly. Now this made it difficult to set the lower angles (20 -25 degrees) using the angle setter, which is why I added a second row of holes.

Regards from Perth
DerekVisit www.inthewoodshop.com for tutorials on constructing handtools, handtool reviews, and my trials and tribulations with furniture builds.
-
5th August 2010, 02:55 PM #5
Hewer of wood
- Join Date
- Jan 2002
- Location
- Melbourne, Aus.
- Age
- 71
- Posts
- 0
Hack the guards or lose them is my advice. If a wheel is going to fracture in normal use it'll be when it's new.
First use, I test them by ringing, then mount and spin them while standing well aside.Cheers, Ern
-
5th August 2010, 06:25 PM #6
Retired Member
- Join Date
- Nov 2006
- Location
- Bendigo Victoria
- Age
- 80
- Posts
- 9,605
Thanks, Derek wasn't quite sure what your reason for the second row of holes was, thanks for that extra info and the distance. Originally Posted by derekcohen

Still have to make the wooden stand, but finished the mount with the bushes today, will add some pics later.
-
5th August 2010, 10:43 PM #7
Retired Member
- Join Date
- Nov 2006
- Location
- Bendigo Victoria
- Age
- 80
- Posts
- 9,605
Got a bit more done today.
Cut a bit of 40x10 aluminium to hold the 2 bushes, set out the distances and drilled the holes for the allen screws to mount them from the bottom.
After polishing the aluminium and the steel tried the tool support and it fits like a glove
Those Delrin sleeves are great, the arms slide in and out very smoothly, actually thinking about doing the same to the bushes on the Scheppach.
Next is the wooden support block for this mount and the base for the grinder and this to sit on. Still thinking about getting the slow grinder (1400RPM), but will see how I go with the standard 2850RPM grinder.
-
6th August 2010, 08:58 PM #8
Retired Member
- Join Date
- Nov 2006
- Location
- Bendigo Victoria
- Age
- 80
- Posts
- 9,605
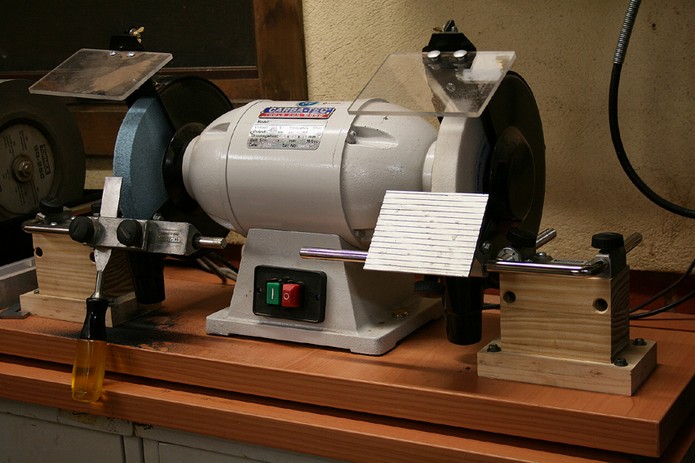
Made the timber support for the tool support/mount today, actually made 2 just in case I will use both of them on the dry grinder.
After that I spent a fair bit of time setting up a mock up of the dry grinder to work out how everything will fit on the bench top, prior to making a stand for it all.
Found out that the horizontal arm on the Jet tool support is appreciably longer than the one on the Scheppach, 275mm from the threaded arm, vs 210mm on the Scheppach. This meant that it would actually reach across the centre of the dry grinder and I would be unable to mount certain jigs because the other grinding stand would be too close. Appears I have 2 choices, mount the tool support further away from the RH grind stone or shorten the horizontal arm to 210mm, will probably take this option.
Also spent some time investigating suitable heights for the dry grinder and the wet grinder. If I mount the dry grinder at the current height (890mm) the horizontal arm sits at a comfortable height for using the jigs and the other grinding stand is easy to use as well.
However, if I mount the wet grinder at the same height the horizontal arm will sit 130mm higher than this and this makes the wet grinder awkward to use, particularly when the bar is mounted in the vertical position.
If I make a separate stand of 760mm high for the wet grinder then both tool supports on the 2 grinders will sit at the same height, making the jigs easier to use and make for more consistency.
So that is probably the way I will go.
Time well spent me thinks
-
13th August 2010, 11:15 PM #9
Retired Member
- Join Date
- Nov 2006
- Location
- Bendigo Victoria
- Age
- 80
- Posts
- 9,605
Made up some base cabinets to take the 2 grinders, different heights as worked out above.
In place and ready for sanding sealer and some satin poly.
There seems enough room to use the machines properly and a bit of bench space to put things like jig etc down whilst working
All I have to do now is make 14 drawers to fill the cabinets
-
13th August 2010, 11:32 PM #10
Deceased
- Join Date
- Jun 2003
- Location
- ...
- Posts
- 4,470
Originally Posted by Big Shed
And also fix up the on/off switch on the wet grinder.
I took mine of and made an mdf top plate and have the switch box sitting beside the leather wheels. There was enough slack in the cable for that. Still have to get some 4 core flex (it needs 2 active wires) to move it to the front of the grinder when I'll stick it on with double sided tape.
Peter.
-
14th August 2010, 09:27 AM #11
Retired Member
- Join Date
- Nov 2006
- Location
- Bendigo Victoria
- Age
- 80
- Posts
- 9,605
Thanks Peter, yes that's another job on the "todo" list Originally Posted by Sturdee

Looking at a few different options atm, but now that the machine is sitting on lower base it is a little easier to reach over to switch on and off, so not a high priority at present, drawers are higher on the list so that all the grinding and buffing bits and pieces can be put together in one place.
Also working on making a single point diamond dresser jig for the wet grinder.
I wonder whether a workshop will ever be finished?
-
14th August 2010, 07:07 PM #12
Deceased
- Join Date
- Jun 2003
- Location
- ...
- Posts
- 4,470
Mine was totally finished about 18 months ago. Everything had a place and was organised, and then I took up wood turning and a whole workshop rearranging is taking place. Originally Posted by Big Shed
Why did I ever do that.
Peter.


 Reply With Quote
